How to Install Lift Kit on Jeep JK: Complete Step-by-Step Installation Guide
This article contains affiliate links. We may earn a commission at no extra cost to you.
How to Install Lift Kit on Jeep JK: Complete Step-by-Step Installation Guide
You’ve been eyeing those 35-inch tires. You’ve been saving photos of Jeeps flexing on Moab trails. You’re tired of dragging the diff over parking lot curbs. A lift kit transforms your Jeep JK from a capable SUV into a genuine off-road weapon — and you’re ready to make it happen.
Three years ago, I stood in the same place. After three months of obsessive research, I settled on a 2.5-inch lift with adjustable control arms for my 2012 JK Unlimited. Not too tall to make highway driving miserable, but enough height to clear 33s comfortably and give me the flex I needed for technical trails. That decision — and the weekend I spent installing it in my driveway — fundamentally changed how I use my Jeep.
Installing a lift kit on a Jeep JK takes 6-10 hours for a first-time DIYer with basic mechanical skills. You’ll need a full socket set, torque wrench, floor jack, jack stands, and penetrating oil. The process involves removing wheels, disconnecting shocks and sway bars, compressing coil springs, replacing suspension components, and torquing everything to spec at ride height. Professional alignment is required after installation.
This guide walks you through every step of a coil spring lift installation on 2007-2018 Jeep Wrangler JK and JKU models. You’ll learn which tools you actually need, how to avoid the mistakes that ruin installs, and what to expect during your first drive on new suspension. If you’ve never done suspension work before, this isn’t the simplest first project — but it’s absolutely achievable with preparation and patience.
One note about specific model year differences that affect suspension: 2007-2011 JKs use slightly different shock mounting than 2012-2018 models, and 4-door JKUs have longer rear springs than 2-door JKs. Verify your kit matches your specific year and door configuration before you start.
Before You Start: Is a DIY Lift Install Right for You?
Let’s be honest: suspension work isn’t an oil change. You’re dealing with loaded springs that can cause serious injury if mishandled. You’re torquing bolts that determine whether your Jeep drives straight or vibrates apart. The stakes are higher than bolt-on accessories.
That said, I learned to wrench on my JK from essentially zero experience. My first solo job was an oil change where I overtightened the drain plug and cracked the pan gasket. I’ve since done everything from control arm bushings to full axle swaps. The difference? I kept a repair journal, watched the install video three times before touching a wrench, and knew when to ask for help. Everyone starts somewhere. The question is whether this particular job should be where you start.
You’re ready for a DIY lift install if you:
- Have experience with basic bolt-on modifications (bumpers, sliders, winch mounts)
- Own or can borrow/rent the specialty tools required
- Have a solid, level workspace with room to work around all four corners
- Can dedicate a full weekend (Saturday install, Sunday troubleshooting buffer)
- Feel comfortable working under a vehicle secured on jack stands
- Have a friend available to help with the heavy lifting and spring compression
Consider professional installation if:
- This would be your first time working under the Jeep
- You’re installing a long-arm kit with frame brackets and welding requirements
- You don’t have access to a spring compressor or don’t feel comfortable using one
- Your JK has significant rust or seized bolts (common in salt belt states)
- You’re upgrading multiple suspension components simultaneously (control arms, track bar, steering, etc.)
Rubicon models have different factory suspension components — specifically disconnectable sway bars and different shock mounts. The process is fundamentally the same, but verify your lift kit includes Rubicon-specific hardware if applicable.
The time commitment matters. First-time installers should budget 8-10 hours. Experienced wrenchers can knock out a basic coil lift in 4-6 hours. If you discover seized bolts, add another 2-3 hours for penetrating oil soaks and persuasion. Don’t start this project Friday evening expecting to wheel Saturday morning.
Required Tools & Equipment Checklist
Nothing stops a DIY install faster than missing the one critical tool you need. Here’s what belongs in your workspace before you crack the first bolt.
Essential Tools (Non-Negotiable):
- Floor jack (3-ton minimum) — Your factory scissor jack won’t cut it. You need stable, repeatable lift points at all four corners.
- Four jack stands (3-ton minimum) — NEVER work under a vehicle supported only by a floor jack. Jack stands are what keep you from becoming a statistic.
- Socket set (metric, 10mm-24mm) — Most JK suspension uses 18mm, 21mm, and 24mm fasteners. Deep sockets are essential for shock bolts.
- Breaker bar (18-inch minimum) — Factory suspension bolts are torqued to 125+ ft-lbs. A standard ratchet won’t break them loose.
- Torque wrench (0-150 ft-lb range) — Suspension torque specs matter. Overtightening causes premature wear; undertightening causes components to work loose.
- Coil spring compressor — Absolutely required for removing and installing coil springs safely. Most auto parts stores rent these for $20-40.
- Penetrating oil (PB Blaster or equivalent) — Spray all suspension bolts the night before. It’s insurance against rounded bolt heads.
- Pry bar or large flathead screwdriver — For persuading control arms into alignment during reassembly.
Highly Recommended Tools:
- Impact wrench (air or electric) — Makes the job 50% faster and dramatically reduces physical fatigue
- Strut spreader or pickle fork — For separating ball joints and tie rod ends
- Ball joint press or pickle fork — If you’re also replacing ball joints during the lift
- Rubber mallet — For convincing components into place without damaging threads
- Wire brush or rotary tool — For cleaning rust off bolt threads
- LED work light or headlamp — Suspension work happens in shadows
- Wheel chocks — Prevent the Jeep from rolling while you’re under it
Where to Rent Specialty Tools: Most AutoZone, O’Reilly, and Advance Auto Parts stores rent spring compressors with a refundable deposit. You pay the tool’s full price upfront, use it for the day, and get your money back when you return it. Ball joint presses work the same way. Don’t buy tools you’ll use once unless you plan to make suspension work a regular hobby.
A note about air tools: Yes, they’re faster. No, they’re not required. I installed my first lift with a breaker bar, a 1/2” ratchet, and a lot of leverage. It took longer. My forearms burned. But the install was just as solid as one done with an impact gun. If you don’t have air tools, budget an extra hour and bring patience.
Safety Setup & Pre-Installation Preparation
Suspension work puts you under a 4,000-pound vehicle supported by nothing but jack stands and physics. This section should make you appropriately cautious.
Critical Safety Rules:
Jack stands go on the frame rails — never on the axle or body. The JK’s frame has dedicated lift points just behind the front wheels and just ahead of the rear wheels. Place jack stands there. Working on a gravel driveway or soft asphalt? Put a 12x12” piece of plywood under each jack stand to distribute the load. One stand sinking an inch while you’re under the Jeep is how bad things happen.
Park on level concrete or asphalt. A 2-degree slope feels flat but creates lateral force on jack stands. If you don’t have level ground, don’t do this job.
Engage the parking brake and put the transmission in first gear (manual) or Park (automatic). Place wheel chocks behind the wheels that remain on the ground. Redundant safety measures matter when you’re removing major suspension components.
Remove the negative battery terminal. You’ll be working near ABS sensors and potentially the airbag system’s impact sensors. A stray wrench touching the wrong terminal can trigger airbags or cause electrical issues.
Spray all suspension bolts with penetrating oil the night before. Hit them again in the morning. JKs rust. Even low-mileage southern Jeeps have surface corrosion on suspension bolts. Penetrating oil is the difference between a bolt that turns and a bolt that snaps.
Pre-Installation Jacking Sequence:
- Loosen all lug nuts while the Jeep is still on the ground (1/4 turn each)
- Jack up the front of the Jeep using the differential as a lift point
- Place jack stands under the frame rails behind the front wheels
- Lower the Jeep onto the stands and shake it aggressively to verify stability
- Remove the front wheels completely
- Repeat the process for the rear: jack, stands, shake, wheels off
With the Jeep securely on stands and wheels removed, take a photo of each corner before you remove anything. These reference photos are invaluable when you’re staring at a pile of bolts wondering which shock mount goes where.
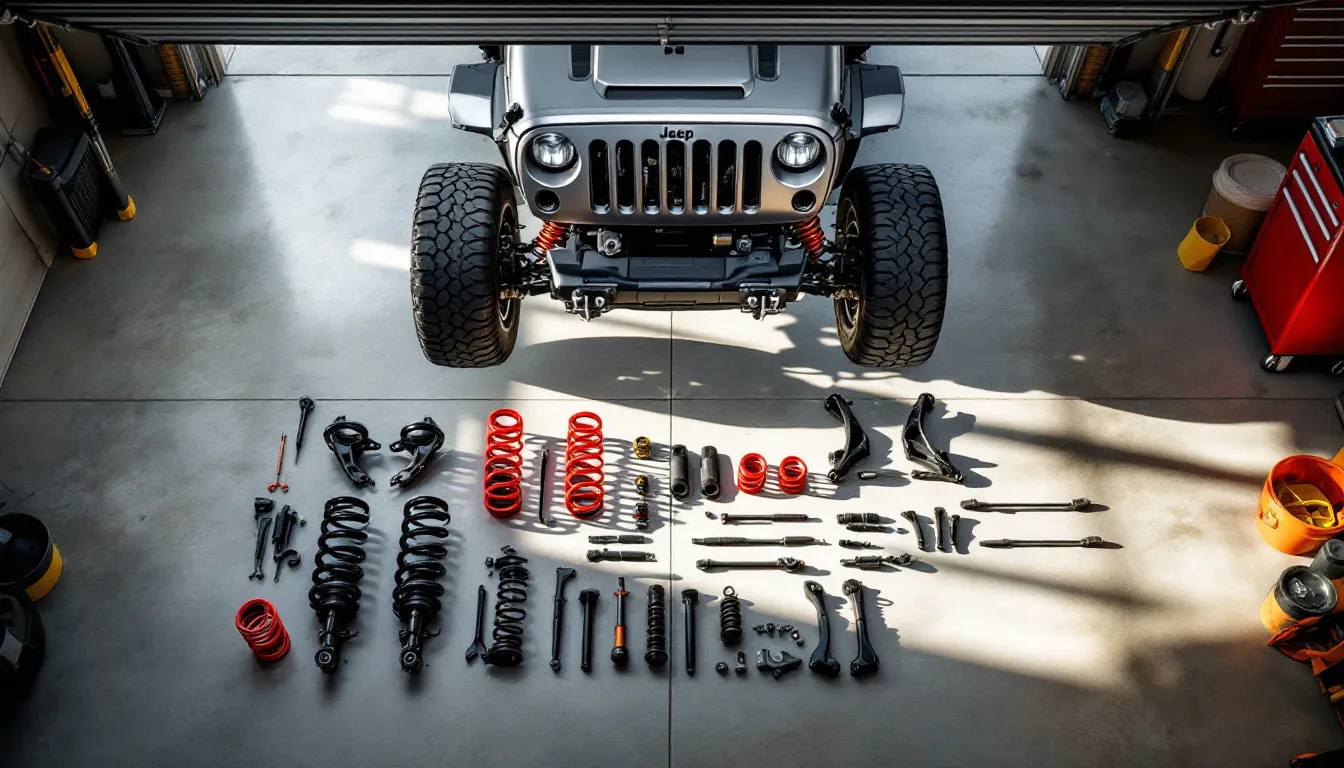
Lay out your new lift kit components and verify everything’s included. Count shocks, springs, bump stops, hardware bags. Most lift kits include an inventory checklist — use it. Discovering a missing part after you’ve torn apart the suspension is a special kind of frustrating.
Step-by-Step Lift Kit Installation Process
This section covers a typical 2.5-3.5” coil spring lift installation. Long-arm kits, coil-over conversions, and extreme lifts (4”+) involve additional steps like control arm replacement, track bar relocation, and brake line extensions. Always follow your specific kit’s instructions — this guide provides the general sequence and critical details that apply to most DIY-friendly coil lifts.
Phase 1: Front Suspension Disassembly
Start with the front driver’s side. You’ll learn the process, troubleshoot any stuck bolts, and develop a rhythm before moving to the other three corners.
1. Disconnect the front sway bar links. These connect the sway bar to the axle. Use an 18mm socket on the bottom nut and an 18mm wrench on the top to prevent the stud from spinning. The links will likely be seized — hit them with penetrating oil and use a breaker bar if needed.
2. Remove the front shocks. Top bolt is accessible from the engine bay (18mm). Bottom bolt goes through the axle mount (21mm). Support the axle with a floor jack before removing the bottom shock bolt — the axle will drop several inches without shock support.
3. Disconnect the brake line bracket from the axle housing. Don’t disconnect the actual brake line — just remove the plastic clip or bolt holding the line to the axle. This gives the axle room to drop without stretching the brake line.
4. Let the axle droop naturally. With the shock removed and brake line freed, the axle will sag down and extend the coil spring. This is normal and necessary for spring removal.
5. Install spring compressors on the coil spring. Use at least two compressor arms on opposite sides of the spring. Tighten them evenly, alternating sides every few turns. The spring needs to compress enough to remove tension from the spring seats. You’ll know it’s ready when you can wiggle the spring slightly in its seat.
6. Remove the spring retaining bolt (if your JK has one — 2012+ models use a small bolt through the lower spring isolator). Then carefully remove the compressed spring, keeping the compressor arms tight. Set it aside in a safe place where it won’t roll.
7. Install the new, longer coil spring. Place the new spring’s bottom coil into the lower spring seat on the axle. The spring should sit in the same orientation as the old one — pay attention to which direction the coils spiral. Compress the new spring using the same compressor technique, then guide the top coil into the upper spring seat on the frame. Once seated, slowly release the compressor tension. The spring will expand to fill the space.
8. Install the new, longer shock. Most lift kits include extended shocks matched to the new suspension height. Install the top bolt first (from the engine bay), then use the floor jack to raise the axle until the bottom shock mount aligns. Install the bottom bolt and snug it finger-tight. Do not torque suspension bolts yet — they must be torqued at ride height, not full droop.
9. Reconnect the sway bar link (if you’re reusing the stock links — some kits include extended links). Snug but don’t torque yet.
10. Repeat the entire process on the front passenger side. It will go faster now that you know the sequence.
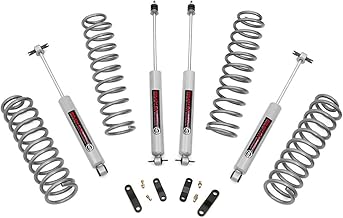
Rough Country 2.5" Lift Kit for 2007-2018 Jeep Wrangler JK Unlimited - 67930
$299.95
Check Price on AmazonPhase 2: Rear Suspension Installation
Rear suspension follows the same logic but with a few JK-specific quirks.
1. Disconnect the rear sway bar links at the axle end. Same technique as the front: 18mm on both ends, hold the stud with a wrench while turning the nut.
2. Remove the rear shocks — top and bottom bolts. Support the axle with a floor jack before removing the bottom bolt. The rear axle is heavier than the front and will drop more dramatically without shock support.
3. Let the axle droop. On 4-door JKUs, the rear axle can droop 8-10 inches without spring tension. This is normal. On 2-door JKs, it’s less dramatic but still significant.
4. Remove the rear track bar bolt from the axle bracket (21mm or 24mm depending on year). You don’t need to disconnect the frame end — just the axle end. This allows the axle to shift laterally for easier spring removal. If you’re working on a 2007-2011 JK, you may encounter known issues with track bar bolts on certain model years — mainly rust and seized threads.
5. Compress and remove the rear coil springs using the same technique as the front. Rear springs are longer and heavier than front springs — use caution and compress evenly.
6. Install new rear springs. Pay attention to spring orientation. Most JK rear springs have a specific top and bottom end marked by paint dabs. Match the orientation of your old springs.
7. Install new rear shocks and extended bump stops (if included in your kit). Again, finger-tight only — no torquing yet.
8. Reconnect the rear track bar to the axle bracket. Snug the bolt but don’t torque yet.
9. Repeat on the other side.
Phase 3: Critical Post-Assembly Steps
This is where many DIY installs fail. You’ve done the hard work of installing components — now you need to do the detail work that makes the lift safe and reliable.
1. Torque all suspension bolts at ride height. This is the single most critical step. Lower the Jeep off jack stands onto the ground. Bounce each corner a few times to settle the suspension. Now torque every suspension bolt to spec (see the next section for specific values). Torquing at full droop or full compression pre-loads the bushings incorrectly and causes premature wear and squeaking.
2. Verify shock travel. With the Jeep on the ground, measure from the bottom shock mount to the top of the shock body. Then jack up one corner until the tire is 6” off the ground. Measure again. You should have at least 2-3 inches of shock shaft visible — this confirms the shock isn’t fully extended at droop. If the shock is maxed out at normal droop, you either installed the wrong length shock or the spring isn’t seated correctly.
3. Check for rubbing or interference. Turn the steering wheel full lock in both directions with someone watching the tire and fender relationship. There should be at least 1-2 inches of clearance between the tire and the inner fender at full turn. If the tire rubs, you may need wheel spacers (more on that later).
4. Test drive at low speed. Drive slowly around the block. Listen for clunks, rattles, or any unusual sounds. The Jeep will feel different — that’s normal. But abnormal noises indicate a problem: loose bolts, improperly seated springs, or interference between components.
5. Re-torque after 50 miles. Suspension bolts can settle slightly after the first few drive cycles. After 50-100 miles, re-torque all suspension bolts. Many lift kit warranties require this step.
JK Suspension Torque Specifications Reference
Torque specs vary slightly by year and kit, but these are the standard values for 2007-2018 Jeep Wrangler JK suspension components. Always verify with your lift kit instructions, as some aftermarket components use different specs.
| Component | Location | Torque (ft-lb) |
|---|---|---|
| Front shock upper mount | Frame | 80 |
| Front shock lower mount | Axle | 125 |
| Rear shock upper mount | Frame | 80 |
| Rear shock lower mount | Axle | 125 |
| Front sway bar link | Axle and sway bar | 75 |
| Rear sway bar link | Axle and sway bar | 75 |
| Track bar axle bolt | Axle bracket | 125 |
| Track bar frame bolt | Frame bracket | 125 |
| Control arm axle bolts | Front and rear axle | 125 |
| Control arm frame bolts | Frame mounts | 120 |
Why torque matters: Under-torqued suspension bolts work loose from vibration. You’ll hear clunking, experience wandering steering, and risk catastrophic failure if a critical bolt backs out. Over-torqued bolts stretch threads, crack bushings, and create stress fractures in mounting brackets. Use a calibrated torque wrench and apply torque in a single smooth pull — don’t bounce or jerk the wrench.
Torque suspension bolts with the suspension at ride height (Jeep on the ground, not jacked up). Torquing at full droop or compression pre-loads bushings and causes premature wear, binding, and that distinctive “groaning” sound when turning.
Post-Installation Checklist & First Drive
You’ve installed the lift. The Jeep is on the ground. You’re ready to drive. Not so fast — post-installation inspection prevents the “why is my Jeep making that noise?” panic three days later.
Immediate Post-Install Checklist:
- All lug nuts torqued to 95-110 ft-lbs (circle the Jeep twice and verify with torque wrench)
- All suspension bolts torqued to spec at ride height
- No tools or parts left under the Jeep (walk around and check)
- Brake lines have adequate slack with suspension at full droop (jack each corner and verify)
- ABS sensor wires not stretched or pinched
- Steering has full range of motion with no binding or rubbing
- All four wheels spin freely with no brake drag
- Floor jack, jack stands, and compressor tools put away (nothing left under the Jeep)
First Drive Protocol:
Drive at low speed (under 25 mph) in your neighborhood for 2-3 miles. Listen carefully for clunks, rattles, grinding, or rubbing sounds. The Jeep will feel different — higher center of gravity, slightly softer initial compression, maybe a bit more body roll. That’s normal. What’s not normal: loud clunking over bumps (loose bolts), grinding sounds (brake interference), or steering wheel vibration (wheel balance issues from tire removal).
After the first short drive, pull back into your driveway and re-check lug nuts and suspension bolts. It’s common for bolts to settle slightly after the first compression cycle.
Then take a slightly longer drive (5-10 miles) at highway speed. The Jeep may feel “floaty” compared to stock — that’s the longer springs and extended shocks allowing more suspension travel. You should not experience violent shaking, steering wheel oscillation, or pull to one side. If you do, stop immediately and inspect for loose components.
Schedule a professional alignment within 24 hours of installation. This is non-negotiable. A lift changes camber, caster, and toe angles. Your Jeep will not track straight, will eat tires, and will feel unstable at highway speed without proper alignment. Budget $100-150 for a full four-wheel alignment at a shop familiar with lifted Jeeps. Tell them you’ve installed a lift and need specs adjusted for the new ride height.
Common DIY Mistakes & How to Avoid Them
Watch for these failure points. They’re the difference between a lift that lasts 100,000 miles and one that squeaks, clunks, and drives like garbage after 5,000.
1. Torquing suspension bolts at full droop instead of ride height. This pre-loads bushings incorrectly. Six months later, you’ll have squeaking control arm bushings and binding suspension. Solution: Lower the Jeep to the ground, bounce each corner, then torque all bolts.
2. Forgetting to disconnect brake line brackets. If you leave the brake line clipped tightly to the axle housing, lifting the Jeep can stretch the brake line to the failure point. You won’t notice until the first big flex event when the line ruptures. Solution: Disconnect brackets before lowering the axle, and verify lines have adequate slack at full droop.
3. Installing shocks backward or in wrong positions. Some lift kits include different length front and rear shocks. Some brands mark shocks “F” and “R” but not obviously. Installing a rear shock in the front position results in bottoming out. Solution: Lay out all components before starting. Match part numbers to the kit’s instruction sheet.
4. Over-compressing coil springs. You only need to compress the spring enough to relieve tension from the seats — not collapse it completely. Over-compression risks spring compressor failure (springs exploding out of compressors cause serious injuries). Solution: Compress evenly, check frequently, stop when the spring can wiggle in its seat.
5. Reusing old, worn bump stops. Stock JK bump stops are designed for factory ride height. After a lift, they may not make contact at full compression, which means metal-to-metal shock bottoming. Some lift kits include extended bump stops. If yours doesn’t, buy them separately. Solution: Inspect bump stops during installation. If they’re compressed, torn, or oil-soaked, replace them.
6. Skipping the 50-mile re-torque. Suspension components settle after the first few heat cycles and compression events. Bolts that felt tight at installation can loosen slightly. Solution: After 50 miles, re-check and re-torque all suspension bolts. Takes 15 minutes. Prevents disaster.
7. Not checking for high-mileage wear during installation. If your JK has over 100,000 miles, there’s a good chance control arm bushings, ball joints, or track bar bushings are worn. Installing a lift on worn components means those parts will fail soon after. Solution: Inspect common JK suspension wear patterns by mileage during disassembly. If bushings are cracked, ball joints have play, or the track bar has excessive lateral movement, replace those parts during the lift install.
Other Components to Consider Upgrading During Your Lift Install
You’ve already got the suspension torn apart. The axles are hanging. The wheels are off. This is the ideal time to address other components that either need upgrading after a lift or are simply easier to replace now than later.
Brake lines: If your JK has over 80,000 miles, consider replacing brake lines while they’re accessible. Rubber brake lines deteriorate from heat and age. Extended braided stainless lines not only handle lift-induced flex better but also improve brake pedal feel.
Sway bar links: Many budget lift kits reuse stock sway bar links. If you’re lifting 2.5” or more, upgraded extended links improve sway bar geometry and reduce the “popping” sound some JKs develop during tight turns. They’re $40-60 and take five minutes to swap during a lift install.
Track bar: The track bar controls lateral axle movement. A worn track bar causes “death wobble” — violent steering wheel oscillation over bumps. If your stock track bar has any play in the bushings or ball joint, replace it during the lift. Adjustable aftermarket track bars let you recenter the axle after the lift.
Ball joints: With the axle drooped for spring removal, it’s trivial to check ball joint play. Grab the knuckle and try to move it — if there’s any clunk or play, those ball joints are due. Replacing them now avoids pulling the axle apart again in six months.
Wheel spacers: After lifting, you may find the tires rub the inner fender or control arms at full turn. Rather than trimming fenders or regearing immediately, 1.25”-1.5” wheel spacers push the tires outboard and usually solve minor rubbing issues.
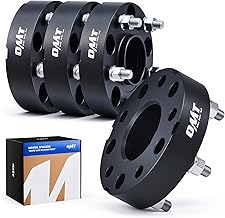
Orion Motor Tech 5x5 Wheel Spacers Compatible with Jeep Wrangler JK Grand Cherokee Commander, 1.5" Wheel Spacers with 1/2x20 Studs, 5x127 71.5 mm Hub Centric Wheel Spacer Kit, Set of 4, Black
$102.99
Check Price on AmazonThe theme here is efficiency: since you’re already under the Jeep with suspension disassembled, replacing wear items or upgrading complementary components takes a fraction of the time it would as a separate job. Budget accordingly, but don’t over-complicate the install. Focus on the lift itself first. Once it’s solid and driving well, you can always revisit additional upgrades.
Frequently Asked Questions
How long does it take to install a lift kit on a Jeep JK?
First-time DIYers should budget 8-10 hours for a basic coil spring lift installation. Experienced wrenchers with air tools can complete the job in 4-6 hours. Add 2-3 hours if you encounter seized bolts, rusty hardware, or decide to replace worn components during installation. The job takes longer than you think — don’t start Friday night expecting to wheel Saturday morning. Plan for a full Saturday install with Sunday as a troubleshooting buffer.
Do I need an alignment after installing a lift kit?
Yes, absolutely. A lift kit changes your Jeep’s camber, caster, and toe angles. Without proper alignment, the JK will pull to one side, eat tires unevenly, and feel unstable at highway speed. Schedule a four-wheel alignment within 24 hours of completing the lift install. Most alignment shops charge $100-150. Tell them you’ve installed a lift and need specs adjusted for the new ride height. This is not optional — it’s a safety requirement and tire-longevity necessity.
Can I install a lift kit without air tools?
Yes. Air tools make the job faster and less physically demanding, but they’re not required. You’ll need a quality breaker bar (18” minimum) to break loose the factory suspension bolts, which are torqued to 125+ ft-lbs. Budget an extra 60-90 minutes compared to using an impact wrench. Spray all suspension bolts with penetrating oil the night before — it’s even more critical when you’re relying on muscle power and leverage instead of air tool impact force.
Will a lift kit void my Jeep warranty?
Potentially, yes — but only for components directly affected by the lift. Under the Magnuson-Moss Warranty Act, a dealer must prove that your modification caused the failure to deny a warranty claim. A lift won’t void the entire vehicle warranty, but if your driveshaft fails, the dealer can reasonably argue the lift’s increased driveline angle caused the problem. If your radio stops working, the lift is irrelevant. Most JK owners installing lifts are past the factory warranty period anyway (3 years/36,000 miles).
Is it safe to drive after installing a lift kit?
Yes, but only if installed correctly. The Jeep will feel different — higher center of gravity means more body roll in turns. Braking distances may increase slightly due to taller, heavier tires. Highway crosswinds affect lifted Jeeps more noticeably. After proper installation and professional alignment, a lifted JK is safe for daily driving, highway travel, and off-road use. The critical factors: all suspension bolts torqued to spec at ride height, professional alignment completed, and appropriate driving adjustments for the new height.
What happens if I don’t torque suspension bolts correctly?
Under-torqued bolts work loose from vibration, causing clunking sounds, wandering steering, and potentially catastrophic failure if a critical bolt backs out. Over-torqued bolts stretch threads, crack bushings, and create stress fractures in mounting brackets. Within 500 miles, you’ll hear groaning sounds during turns (bushing bind) or develop “death wobble” from loose track bar or control arm bolts. Use a calibrated torque wrench and apply specs from your lift kit instructions or check the differences between JK and newer JL suspension design for context on why JK torque specs matter for bushing longevity.
Final Thoughts: You Can Do This (With Preparation)
A lifted Jeep changes how you interact with terrain. That first time you clear an obstacle that would’ve scraped your diff on stock suspension, the 10 hours you spent in your driveway will feel worth it. The capability gain is real — but so is the confidence gain from tackling a job most people outsource to shops.
My 2.5-inch lift has been on for three years and 40,000 miles. It’s driven fire roads in Colorado, sand washes in Moab, and daily commutes through Wisconsin winters. No squeaks. No clunks. No regrets. The only thing I’d change? I’d have upgraded control arms at the same time instead of six months later.
That’s part of the larger journey. My current build plan includes steel bumpers, 35-inch tires, a full Raptor coat for rust protection, and overland gear for multi-day trips. The lift was step one. It won’t be your last modification — but it’s often the one that fundamentally shifts how you see your Jeep’s potential.
If you’re still debating whether a JK is the right platform for your build goals, start with choosing the right JK for your build goals — it covers year-specific differences that affect modification potential. Once you’re committed to the JK platform, explore more lift kit options and suspension upgrades to find the setup that matches your use case.
You’ve got the guide. You’ve got the tool list. You’ve got realistic time expectations and safety protocols. The only thing left is to order the kit, clear your weekend schedule, and commit to the process. Take your time. Double-check torque specs. Ask for help when you need it. This is absolutely achievable — and three months from now, you’ll be the one giving advice to the next person asking how hard it really is.
This article contains affiliate links. If you purchase through these links, we may earn a small commission at no extra cost to you. This helps support the site and allows us to continue creating content for the Jeep JK community.
Get the Free JK Build Planner
Complete PDF with mod checklists, gear ratios, tire sizing charts, and budget worksheets. Everything you need to plan your JK build.
No spam. Unsubscribe anytime. By subscribing, you agree to our Privacy Policy.
Allan
I'm Allan. I bought a 2014 Jeep Wrangler JKU and I research the hell out of every mod before I touch it. Everything here is tested or deeply researched on my own rig - no sponsored fluff, just honest findings.
Learn more about me →Get the JK Build Planner
Free PDF with complete build checklists, gear ratios, and tire fitment guides.
By subscribing, you agree to our Privacy Policy.
Related Articles
Best Lift Kits for Jeep Wrangler JK: Ultimate 2026 Buying Guide
Find the best lift kit for your Jeep Wrangler JK. Expert comparison of coil spring, spacer, and long-arm lifts with real-world testing and honest recommendations.

How to Regear Jeep JK: Complete DIY Guide to Changing Gear Ratios
Best Front Sway Bar Links for Jeep JK: Quick-Disconnect & Heavy-Duty Options
Find the right front sway bar links for your Jeep JK. Compare quick-disconnect vs fixed links, learn compatibility by model year and lift height, and improve both trail articulation and daily driving.