How to Regear Jeep JK: Complete DIY Guide to Changing Gear Ratios
How to Regear Your Jeep JK: Complete Guide to Changing Gear Ratios
I ran 35-inch tires on stock 3.21 gears for four miserable months. My 2015 JK Sport felt gutless—struggling to merge onto highways, downshifting on the slightest incline, and screaming at 3,000 RPM just to maintain 70 mph. Every drive reminded me that I’d made a rookie mistake: upgrading to larger tires without addressing the gear ratio.
When I finally regeared both axles to 4.56, the difference was like driving a completely different vehicle. Highway cruising dropped back to a comfortable 2,200 RPM. The automatic transmission stopped hunting for gears on moderate hills. Throttle response came back. Even fuel consumption improved because the engine wasn’t laboring anymore. Regearing is the most important modification after installing larger tires on a Jeep JK—and it’s the only one that actually fixes the problem instead of masking it.
This guide walks you through everything I learned: when to regear, choosing the right ratio, gathering tools and parts, the complete installation process, and whether DIY or professional work makes sense for your situation. Whether you tackle this yourself or hire a specialist, understanding how regearing works helps you make informed decisions and verify quality work.
When Your Jeep Actually Needs Regearing
Regearing becomes necessary when you’ve fundamentally changed your Jeep’s rolling diameter. Larger tires increase rotational mass and effectively change your gear ratio—like shifting from fourth gear to third gear permanently. Your engine works harder to turn those bigger tires, and your transmission struggles to find the right gear for the conditions.
Watch for these symptoms:
- Sluggish acceleration from stops and when merging into traffic
- Excessive downshifting on moderate hills or gradual inclines
- High engine RPM at highway speeds (above 2,500 RPM at 65-70 mph)
- Poor fuel economy beyond what larger tires alone would cause
- Transmission hunting between gears during steady-speed driving
- Reduced towing capacity or struggling under load
The severity depends on your current gear ratio and tire size. A 2-door Sport with 3.21 gears and 35-inch tires suffers dramatically more than a Rubicon with 4.10 gears running the same tire size. Different JK model years came with varying stock ratios—2007-2011 models typically had 3.21 or 3.73, while later models and different trim levels offered 4.10 as standard on Rubicons.
Many owners initially try a tuner or programmer to fix these issues. These devices adjust shift points and throttle mapping, but they cannot compensate for the mechanical disadvantage of undersized gears. Regearing is the only real solution because it restores the proper relationship between engine power, transmission gearing, and wheel rotation.
Choosing Your Gear Ratio: The Numbers Actually Matter
Selecting the correct ratio requires balancing your tire size, driving style, transmission type, and intended use. Too aggressive (numerically high) and you’ll lose highway fuel economy. Too conservative (numerically low) and you’ll still experience the sluggish performance that prompted the regear in the first place.
Recommended gear ratios by tire size:
- 32-33 inch tires: 3.73 (stock upgrade) or 4.10
- 33-35 inch tires: 4.56 (sweet spot for mixed use)
- 35-37 inch tires: 4.88 or 5.13
- 37+ inch tires: 5.13 or 5.38
When I chose 4.56 gears for my 35-inch tires, I considered that 80% of my driving happens on highways and paved roads, with weekend trail use. The 4.56 ratio provided excellent throttle response without sacrificing highway comfort. My engine sits at a comfortable 2,200 RPM at 70 mph—fast enough to pass without downshifting, but not screaming like it did on stock gears.
Automatic transmissions benefit more from slightly higher (numerically greater) ratios than manuals. The automatic’s torque converter and wider gear spread mean it handles higher ratios better on the highway. If you have an automatic and run 35s, consider 4.88 gears instead of 4.56, especially if you do significant rock crawling or towing.
Your Jeep’s primary purpose matters too. Daily highway commuters lean toward conservative ratios (4.56 for 35s). Dedicated trail rigs that see occasional highway use can run more aggressive ratios (5.13 for 35s) without concern. Mixed-use Jeeps—the majority of JK owners—find the middle ground provides the best compromise.
Don’t forget about speedometer and odometer calibration. Most gear ratio changes require recalibration through either a dealer programmer or aftermarket tuner. This ensures accurate speed readings and prevents transmission shift issues caused by incorrect speed sensor data.
Tools and Parts: The Reality of What You’ll Actually Need
Regearing demands specialized tools and precision parts. Attempting this job without the right equipment leads to improper bearing preload, gear noise, or premature failure. Budget carefully—the tool investment approaches or exceeds professional installation costs for first-time DIYers.
Specialized Tools You Cannot Improvise
- Inch-pound torque wrench (0-250 in-lbs range for bearing preload)
- Foot-pound torque wrench (30-200 ft-lbs for pinion nuts and ring gear bolts)
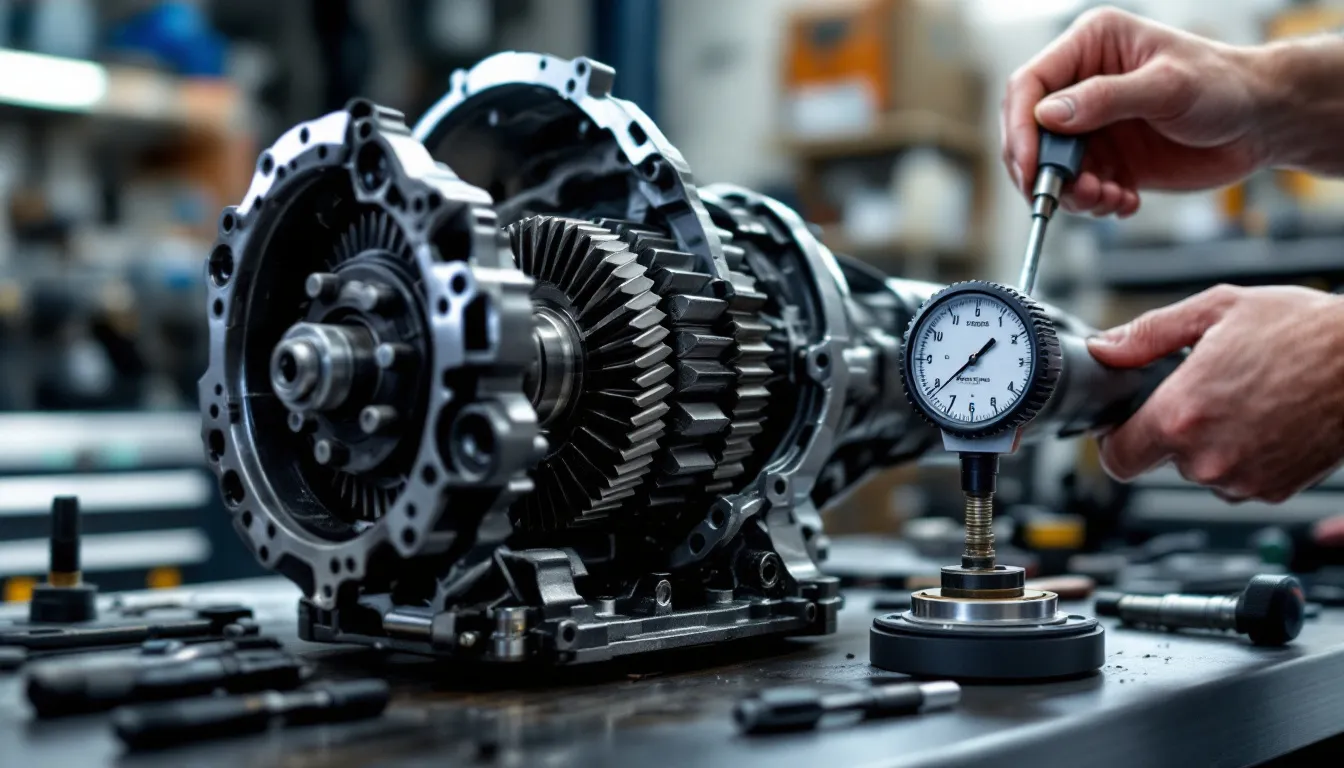
- Dial indicator with magnetic base (measuring backlash to 0.001-inch precision)
- Bearing race installation tools or quality bearing drivers
- Pinion depth setting tools (shims and gauges for proper mesh)
- Gear marking compound (checking tooth contact pattern)
- Impact wrench (removing the pinion nut without spinning the pinion)
- Hydraulic press (installing and removing bearing races)
Standard Shop Tools You Might Already Have
- Socket set with deep sockets (various sizes for differential bolts)
- Combination wrenches (10mm through 22mm)
- Pry bars and prybars (removing differential covers and axle shafts)
- Drain pans (at least 2-gallon capacity for gear oil)
- Shop towels and degreaser (cleaning surfaces)
- Rubber mallet (seating components without damage)
Parts for Both Front and Rear Differentials
Ring and pinion gear sets must match ratios exactly between front and rear Master install kits including bearings, seals, shims, crush sleeve, pinion nut Differential cover gaskets or high-quality RTV silicone Gear oil (typically 3-4 quarts per differential, 75W-90 synthetic recommended) Friction modifier (if you have a limited-slip differential)
The Valvoline FlexFill Advanced Full Synthetic 75W-90 Gear Oil provides reliable lubrication for your new gears. Synthetic formulations resist breakdown better than conventional oils, especially during the intense gear meshing in initial operation.

Valvoline FlexFill Advanced Full Synthetic 75W-90 Gear Oil 1 Quart Pouch
$15.48
Check Price on Amazon →You’ll also need bearing and seal kits if you’re replacing axle bearings during the regear—a smart move since the differential is already apart. The Rear Axle Bearing and Seal Kit for Jeep Wrangler JK ensures your wheel bearings remain in optimal condition.

2pcs Rear Axle Bearing and Seal Kit Compatible with Jeep Wrangler JK/JKU 2007-2018
$77.88
Check Price on Amazon →Budget reality: Plan on $800-1,200 for parts on both axles (gears, master kits, oil). Specialized tools add another $300-600 if purchasing new. Auto parts stores rent dial indicators and bearing pullers, which reduces upfront costs. Total DIY project cost runs $1,100-1,800 including tools and parts. Professional installation typically costs $1,000-1,500 in labor alone, not including parts.
Step-by-Step Regearing: The Process From Start to Finish
Regearing requires patience, precision, and meticulous attention to detail. Documentation during disassembly saves hours during reassembly. Take photos of every step. Label shims with masking tape. Note the position of components before removing them.
This process covers the rear differential—the easier of the two to regear. The front differential follows similar steps but includes complications from unit bearings and inner axle seals.
Phase 1: Preparation and Disassembly
1. Safety First (30 minutes) Park on level ground and engage the parking brake. Lift the rear of the Jeep using a quality floor jack, then support it on jack stands rated for the vehicle weight. Never work under a Jeep supported only by a jack. Remove both rear wheels and set the parking brake to prevent rotation during initial disassembly.
2. Drain the Differential (15 minutes) Place a drain pan under the differential. Remove the differential cover bolts in a crisscross pattern, starting from the top. Be prepared for fluid to pour out as you remove the last few bolts. Once drained, thoroughly clean the inside of the housing with brake cleaner and shop towels—any debris left inside will contaminate your new gears.
3. Remove the Carrier Assembly (45 minutes) Rotate the driveshaft until you can access all the differential bearing cap bolts. Mark the bearing caps with a punch or paint marker—they must return to their original positions. Remove the bearing caps and carefully pry the carrier assembly out of the housing. The carrier contains the ring gear, spider gears, and side bearings.
4. Extract the Pinion Gear (30 minutes) Mark the pinion nut position relative to the pinion shaft—this gives you a reference for initial reassembly depth. Use an impact wrench to remove the pinion nut (it’s torqued to 210+ ft-lbs). Pull the pinion yoke using a three-jaw puller. The pinion shaft should slide out of the housing, bringing the crush sleeve and inner bearing with it.
Phase 2: Installing New Bearings and Races
5. Remove Old Bearing Races (20 minutes) Use a brass punch and hammer to carefully drive out the old pinion bearing races from the differential housing. Work around the race circumference, tapping evenly to prevent cocking. Clean the race bores thoroughly—even small debris prevents proper seating of new races.
6. Install New Bearing Races (30 minutes) Chill the new races in a freezer for 30 minutes—thermal contraction helps them seat easier. Use a bearing race installation tool or quality bearing driver to press the races squarely into the housing. Tap around the circumference until the race seats fully against the shoulder. An improperly seated race causes bearing preload issues and gear noise.
7. Press Bearings onto Gears (45 minutes) Use a hydraulic press to install the inner and outer pinion bearings onto the new pinion gear. Apply steady, even pressure—never hammer bearings onto gears. Install the ring gear onto the carrier using new bolts (ring gear bolts are one-time use). Apply medium-strength threadlocker and torque to 89 ft-lbs in a star pattern.
Phase 3: Setting Pinion Depth (The Tricky Part)
8. Calculate Pinion Depth with Shims (60-90 minutes) This is the most critical and challenging step. The pinion depth determines how deeply the pinion gear meshes with the ring gear. Each gear set includes an etched number indicating the required shim adjustment from nominal.
Start with the shim thickness that came in your master install kit, adjusted by the number etched on your pinion gear. Assemble the pinion with the shim stack, inner bearing, and collapsible spacer. Install the outer bearing, yoke, and pinion nut. Torque the pinion nut in small increments while rotating the pinion to seat the bearings.
Use a dial indicator to measure pinion depth against the carrier centerline. Compare this measurement to the service manual specification for your axle. Adjust shim thickness as needed—adding shims pushes the pinion deeper, removing shims brings it out. This process often requires multiple attempts to achieve the correct depth within 0.001 inches. Expect this to be frustrating on your first attempt. It’s normal.
Phase 4: Setting Backlash and Bearing Preload
9. Install Carrier and Set Backlash (60 minutes) Install the carrier assembly with the new ring gear into the differential housing. Secure the bearing caps in their original positions. Mount a dial indicator to measure backlash—the movement between the ring and pinion gears when you rock the ring gear back and forth.
Target backlash runs between 0.005 and 0.009 inches (check your specific gear manufacturer’s specs). Adjust backlash by moving shims from one carrier bearing to the other. Moving a shim from the ring gear side to the pinion side increases backlash. Moving it the opposite direction decreases backlash.
10. Set Carrier Bearing Preload (30 minutes) Once backlash is correct, add equal shim thickness to both sides to create bearing preload. This preload prevents the carrier from moving side-to-side during operation. Target preload for used bearings: 10-20 inch-pounds of rotational torque. For new bearings: 15-25 inch-pounds. Measure this with an inch-pound torque wrench using a socket on the carrier bearing cap bolts.
Phase 5: Verify Gear Mesh Pattern
11. Check Tooth Contact Pattern (30 minutes) Apply gear marking compound to several teeth on the ring gear. Rotate the pinion through the ring gear while applying resistance (use the parking brake). Examine the contact pattern on the ring gear teeth.
Correct pattern: Contact centered on the tooth face, covering 50-60% of the tooth length, positioned slightly toward the toe (inner edge). Drive side and coast side patterns should be similar. If the pattern is too high, too low, too far toward heel or toe, you need to adjust pinion depth, backlash, or both.
This pattern verification often reveals that your initial pinion depth or backlash needs adjustment. Don’t skip this step—a poor mesh pattern causes noise, vibration, and premature wear.
12. Final Assembly (45 minutes) Once the mesh pattern is correct, apply a thin bead of RTV silicone to the differential cover mating surface. Install the cover and torque the bolts to 30 ft-lbs in a crisscross pattern. Fill the differential with the recommended amount of 75W-90 synthetic gear oil (typically 2.7 quarts for JK rear axles). Add friction modifier if you have a limited-slip differential.
Realistic time commitment: 12-16 hours for the rear differential. The front differential adds another 8-12 hours due to unit bearing complications and inner axle seals.
Front vs Rear Differential: Why Front Is Harder
The rear differential is mechanically simpler and serves as the ideal learning platform for first-time regears. It features a straightforward carrier design, easily accessible pinion bearings, and no complications from steering or CV joints. Most DIYers complete the rear axle first to build confidence and develop a feel for bearing preload and gear mesh patterns.
Rear differential characteristics:
- Single-piece axle shafts that slide out easily
- No unit bearings or complex seal arrangements
- Straightforward access to carrier bearings
- Simpler bearing preload adjustment
The front differential presents additional challenges that catch inexperienced mechanics off guard. The unit bearings integrate the wheel bearing and hub into a single assembly that requires special tools to remove and install. Inner axle seals protect the differential from contamination but demand precise installation—too much force damages the seal, too little causes leaks.
Front differential complications:
- Unit bearings requiring a press and special sockets
- Inner axle seals that must be perfectly seated
- CV axle shafts with more complex removal
- Right-side disconnect housing on non-Rubicon models
- Steering knuckle interference requiring partial disassembly
Many DIYers successfully complete the rear differential but opt for professional installation on the front. This hybrid approach saves money while avoiding the specialized tools and knowledge gap for front-specific components.
DIY vs Professional Installation: The Honest Breakdown
Choosing between DIY and professional installation depends on your mechanical aptitude, available time, tool access, and budget constraints. Neither option is wrong—match the approach to your actual situation.
Choose DIY installation if:
- You have prior experience with bearing preload and shimming
- You own or can rent the specialized tools (dial indicator, bearing pullers, press)
- You have 16-24 hours available over several days for the complete job
- You enjoy mechanical challenges and learning new skills
- Your budget prioritizes saving $1,000-1,500 in labor costs
- You have a backup vehicle during the inevitable troubleshooting phase
Choose professional installation if:
- You lack the specialized tools and don’t want to invest in one-time-use equipment
- Your time is limited or you need the Jeep operational quickly
- You have no prior differential experience and limited mechanical background
- You want warranty coverage on the installation work
- The peace of mind of expert installation is worth the cost
- You’ve read this guide and feel overwhelmed by the complexity
When I started learning to wrench on my JK, I had never changed my own oil. Over time, I graduated from basic maintenance to more complex repairs. Regearing represents a significant jump in difficulty—not impossible for beginners, but expect mistakes, frustration, and potentially needing professional help to correct errors.
Professional shops typically charge $500-750 per axle for installation labor. They complete the work in 6-8 hours rather than your 16-24 hours. They warranty their work, and most importantly, they have the experience to quickly diagnose and correct mesh pattern issues that might take you hours to troubleshoot.
If you’re buying a used JK and the seller has already installed larger tires, verifying proper regearing becomes critical. Ask for documentation of the work. A reputable shop provides an invoice showing the gear ratio installed and a warranty period. Missing documentation on a regeared differential should raise concerns about the quality of the installation.
After the Regear: Break-In and Verification
Proper break-in extends the life of your new gears and prevents premature wear. New gear sets require a bedding-in period where the tooth surfaces gradually conform to each other through controlled use.
Follow this break-in procedure:
-
First 50 miles: Drive conservatively at varying speeds. Avoid sustained highway speeds and heavy acceleration. No towing or aggressive off-roading.
-
50-500 miles: Gradually increase load and speed. Include a mix of city and highway driving. Check for unusual noises, vibrations, or leaks after each drive.
-
At 500 miles: Change the differential fluid completely. This removes metal particles from the initial break-in period. Inspect the old fluid for unusual amounts of metallic debris or chunks—small glitter is normal, but larger pieces indicate problems.
-
After 500 miles: Return to normal driving, towing, and off-roading. Change differential fluid at regular service intervals (30,000-50,000 miles).
When I regeared to 4.56 gears, the transformation was unmistakable. Throttle response felt crisp again. The automatic transmission held gears confidently instead of hunting. Highway cruising at 70 mph dropped from 3,000 RPM to a comfortable 2,200 RPM. That immediate improvement tells you the regear succeeded.
Signs of successful regearing:
- Engine RPM at highway speeds matches your calculated expectations
- Strong acceleration from stops without transmission hunting
- Comfortable passing power without multiple downshifts
- No unusual whining, grinding, or howling noises from the differentials
- Transmission shifts smoothly at appropriate speeds
- Improved fuel economy (once the break-in period completes)
Warning signs requiring attention:
- Whining that changes pitch with speed (incorrect pinion depth or backlash)
- Grinding or clicking during turns (front differential bearing preload issues)
- Leaks from differential covers or pinion seals
- Excessive heat in differential housing after moderate driving
- Vibrations that increase with speed
Address any unusual noises or symptoms immediately. Gear noise that develops after the break-in period indicates improper setup that will cause premature wear. Most shops warranty their regearing work for 12 months or 12,000 miles—use that warranty if problems develop.
Frequently Asked Questions About Regearing a Jeep JK
Can I regear just the front or rear differential?
No, you must regear both differentials to matching ratios. Running mismatched gear ratios between front and rear axles causes the transfer case to bind in 4WD, leading to driveline damage. The front and rear ring and pinion sets must be identical ratios for the Jeep to function properly in four-wheel drive.
Do I need to reprogram my Jeep after regearing?
Yes, you should recalibrate the speedometer and tire size settings after regearing. Most dealers can perform this with a factory scan tool for $50-150, or you can use an aftermarket tuner to adjust tire size and gear ratio parameters. Proper calibration ensures accurate speed readings and correct transmission shift points.
How long do regeared differentials actually last?
Properly installed gears with correct setup last 100,000-200,000+ miles with regular maintenance. Poor installation, incorrect mesh patterns, or improper bearing preload dramatically reduces lifespan. Follow the break-in procedure and change differential fluid at recommended intervals to maximize longevity. Learn about common JK problems by year to understand what maintenance prevents issues.
Can I reuse my old carrier bearings?
No, always replace carrier bearings and pinion bearings during a regear. Used bearings have established wear patterns that don’t match the new gear geometry. Reusing old bearings causes noise, vibration, and premature failure. Master install kits include all necessary bearings, seals, and hardware—don’t cut corners on these critical components.
What’s the difference between a master install kit and a mini install kit?
A master install kit includes all bearings, races, seals, pinion nut, crush sleeve, shims, and hardware needed for complete installation. A mini install kit contains only the pinion seal, crush sleeve, pinion nut, and shims—it assumes you’re reusing bearings. Always use a master install kit when regearing—the cost difference is minimal compared to the risk of bearing failure.
Do automatic transmissions perform better than manuals with regearing?
Both transmissions benefit equally from proper regearing, but automatics show more dramatic improvement in driveability. The automatic’s torque converter and wider gear spread make it more sensitive to gear ratio changes. Manual transmission JKs gain better acceleration and reduced engine lugging, while automatics gain smoother shifting, reduced transmission hunting, and improved torque converter lockup behavior.
The Bottom Line: Is Regearing Worth It?
Regearing transforms your Jeep JK from struggling with oversized tires to performing like it should. Whether you tackle this project yourself or hire a professional, understanding the process helps you make informed decisions and verify quality work.
The DIY path offers significant cost savings and the satisfaction of mastering a complex mechanical skill. The professional route provides expertise, warranty coverage, and the confidence of work performed by someone who has regeared hundreds of differentials. Neither choice is wrong—match the approach to your skills, resources, and comfort level.
If you’re debating whether regearing your JK makes sense, consider this: the JK vs JL comparison shows that properly regeared JKs compete well with stock JLs in driveability and capability. A $1,500-2,000 regear investment extends your JK’s useful life by years and makes every drive more enjoyable.
Regearing isn’t glamorous, but it’s arguably the most impactful modification you can make. Reclaiming the throttle response, highway comfort, and towing capacity that larger tires took away makes your Jeep fun to drive again. That’s exactly what brought you to the JK platform in the first place.
Get the Free JK Build Planner
Complete PDF with mod checklists, gear ratios, tire sizing charts, and budget worksheets. Everything you need to plan your JK build.
No spam. Unsubscribe anytime. By subscribing, you agree to our Privacy Policy.
Allan
I'm Allan. I bought a 2014 Jeep Wrangler JKU and I research the hell out of every mod before I touch it. Everything here is tested or deeply researched on my own rig - no sponsored fluff, just honest findings.
Learn more about me →Get the JK Build Planner
Free PDF with complete build checklists, gear ratios, and tire fitment guides.
By subscribing, you agree to our Privacy Policy.
Related Articles
Coilover Suspension vs Traditional Lift Kit Jeep Jk Comparison
A coilover suspension is a single-unit shock absorber and coil spring assembly that replaces your JK's factory suspension components, offering height...
Best Steering Stabilizers for Jeep JK: Fix Death Wobble & Improve Handling
Affiliate Disclosure: JeepJK Guide earns a commission from qualifying Amazon purchases at no extra cost to you. We only recommend products we've...
JK Lift Kit vs Leveling Kit: Which Is Right for Your Jeep Wrangler?
A leveling kit corrects the JK's factory front-to-rear rake with low-cost spacers, while a lift kit raises the entire vehicle with new springs, shocks,...