JK Death Wobble Fix: Step-by-Step Diagnosis & Repair Guide
JK Death Wobble Fix: Step-by-Step Diagnosis & Repair Guide
Affiliate Disclosure: JeepJK Guide earns a commission on qualifying purchases made through links on this page. This does not affect our recommendations or editorial content.
How to Fix Jeep JK Death Wobble
I hit the death wobble at highway speed on a bridge expansion joint with my wife and baby in the vehicle. The entire front axle started oscillating side to side so violently I could barely hold the steering wheel. Your instinct is to brake — which makes it worse. I pulled over shaking. Literally shaking.
That single event taught me more about JK front-end geometry than any forum post ever could. The root cause turned out to be a worn track bar bushing combined with loose steering box bolts. I replaced the track bar with an adjustable unit, torqued the steering box to spec, and added a heavy-duty steering stabilizer as insurance. Haven’t had a wobble since.
Death wobble is a violent, high-frequency oscillation of the front axle that typically triggers above 55 mph when the front wheels hit a bump or expansion joint. It’s not a single part failure — it’s accumulated play in one or more front-end components that allows your solid front axle to hunt side to side. The fix isn’t buying a steering stabilizer and hoping. The fix is finding which component is actually loose or worn, repairing it with correct torque specs, and building a maintenance habit around it so it doesn’t happen again.
This guide walks you through the full diagnosis sequence: identifying which component is actually causing your specific wobble, repairing each culprit with the correct torque specs, and knowing when a steering stabilizer helps versus when it’s just masking a safety hazard. If you’ve recently installed lift kits for Jeep Wrangler JK or you’re working through a JK maintenance schedule, this diagnostic process belongs in your toolkit right now.
What Actually Causes Jeep JK Death Wobble
Death wobble isn’t a mystery once you understand the mechanics. It’s the result of accumulated play in one or more front-end components — and that play is all your solid front axle needs to start hunting side to side uncontrollably. On a lifted Wrangler JK, the problem compounds because lift height changes the geometry of every steering and suspension linkage, which puts more stress on bushings and joints.
The track bar is the most common culprit on lifted JKs. When you add lift height, the factory track bar geometry changes dramatically. The bar runs at an increased angle, which puts more lateral stress on its bushings and mounting hardware. Over thousands of miles, those bushings compress, the rubber separates from the metal sleeve, and suddenly you’ve got clearance where there should be none. That’s all the axle needs.
But that’s rarely the whole story. Death wobble is almost always a combination of issues, not a single smoking gun. Here’s what you’re actually dealing with:
- Track bar — Bushing wear or loose end bolts allow the front axle to shift laterally; the leading cause in lifted JKs
- Track bar bracket — The factory axle-side bracket can crack or deform, especially on hard-used JKs with larger tires that amplify every shock
- Ball joints — Upper and lower ball joints on the Dana 30 or Dana 44 front axle wear over time; worn joints introduce angular play that destabilizes the entire axle
- Tie rod ends — Loose or worn tie rod ends allow the steering linkage to flex under load, feeding oscillation back into your hands
- Drag link ends — The drag link connects the steering box to the axle; worn ends contribute directly to steering instability and wobble initiation
- Wheel bearings — A loose or failed front wheel bearing creates runout that can initiate wobble, particularly at highway speed
- Steering box adjustment — The factory recirculating-ball steering box can develop internal play; too loose and it amplifies every front-end movement
- Control arm bushings — Worn upper or lower control arm bushings allow the axle to move in ways it shouldn’t; see adjustable control arms for the JK for upgraded options
- Caster angle — Insufficient caster (common after a lift without a caster correction kit) reduces steering return-to-center force and makes wobble more likely to sustain itself once it starts
- Tire balance and condition — Out-of-balance tires or tires with flat spots can trigger wobble even when all mechanical components are tight; this is why the first diagnostic step matters
Model-year note: 2007–2011 JKs used a slightly different front-end geometry than 2012–2018 models. The 2012 refresh included steering improvements, so early-year JKs tend to be more sensitive to ball joint and track bar wear. If you’re on a pre-2012 JK, check those components first — they’re more likely to be the culprit.
Tools You Need Before You Start
You’ll need basic hand tools plus a few specific items before you crawl underneath. Having everything ready saves time and prevents the frustrating stop-and-go that kills a Saturday afternoon.
Here’s what you actually need:
- Floor jack and jack stands — Never work under a Jeep supported only by a floor jack. Period.
- Pry bar — Essential for checking play in ball joints, track bar ends, and tie rod ends without forcing anything
- Torque wrench — You’ll need accurate torque readings when re-tightening or replacing components; a 1/2-inch drive that reads up to 150 ft-lbs covers most JK specs
- Breaker bar and 1/2-inch drive socket set — Track bar bolts and control arm bolts are torqued high and require real leverage to break loose without stripping
- Grease-compatible flashlight or work light — Front-end inspection requires seeing into tight spaces around the axle and knuckles
- Ball joint separator / pickle fork — Needed to separate ball joints, tie rod ends, and drag link ends without damaging the taper seat
- Tape measure — For checking caster angle after any component replacement
- Marker or paint pen — Mark bolt positions before removal to track any movement during diagnosis
- Shop manual or torque spec reference — Have your JK-specific torque values on hand before you start re-assembly; guessing is how mistakes happen
No specialty tools beyond this list are required for a basic front-end inspection and track bar replacement. If you get into ball joint replacement, a ball joint press (or access to a shop press) becomes necessary — this is where you either rent or find a friend with equipment.
Step-by-Step Death Wobble Diagnosis: Find the Culprit
The fastest way to diagnose death wobble is to work from the most likely causes toward the least likely, in a specific order. This isn’t theory — this is the sequence that works because it addresses what fails most often on JKs in the real world. Don’t throw parts at it randomly. Every replaced component costs time and money, and the real culprit is usually one or two items hiding in plain sight.
Follow this seven-step sequence before purchasing anything:
Step 1: Check Tire Pressure and Balance First
Eliminate the free stuff first. Uneven tire pressure or a wheel that’s thrown a weight can absolutely mimic death wobble. It sounds like a front-end problem but the solution is fifteen minutes with a tire plug kit. Set all four tires to the pressure spec on your door jamb sticker and have them balanced if you haven’t done it recently. This step costs nothing and eliminates the most common false positive.
Step 2: Inspect the Track Bar with the Jeep on the Ground
With the wheels on the ground and the steering wheel centered, have a helper rock the steering wheel slightly left and right while you watch the track bar from underneath. Any visible lateral movement in the track bar ends or brackets means you’ve found a primary contributor. The track bar bolts on a JK should be torqued to 74 ft-lbs on the axle side and 55 ft-lbs on the frame side — check them first with your torque wrench before assuming the bushing is blown. More than half the track bar problems I’ve seen were actually just loose bolts that had never been retorqued after a previous service.
Step 3: Lift the Front End and Check Ball Joints
With the front axle supported on jack stands under the axle tubes (never under the control arms), grab each front tire at the 12 and 6 o’clock positions and attempt to rock it vertically. Any detectable movement indicates worn ball joints — there should be absolutely zero play. Repeat at the 9 and 3 o’clock positions to check for wheel bearing play. A worn bearing will show more looseness at the sides.
Step 4: Check Tie Rod Ends and Drag Link Ends
With the front still lifted, grab each tie rod end and drag link end and attempt to move the stud in its socket. There should be zero play. Even a small amount of slop can feed oscillation through the steering linkage like an electrical feedback loop. My own diagnosis revealed a worn track bar bushing and a loose drag link end — either one alone would have caused problems, and both together made the wobble violent enough to be genuinely dangerous.
Step 5: Inspect the Steering Box for Play
With the wheels pointed straight and the engine off, turn the steering wheel by hand. More than about 1/4 inch of dead-band (steering movement that produces no wheel movement) before the wheels begin to move suggests the steering box needs adjustment or replacement. A loose steering box amplifies every other source of play in the front end. This is a critical step people skip.
Step 6: Check Control Arm Bushings
With the vehicle on jack stands, use a pry bar to check for movement at each control arm bushing. Worn bushings allow the axle to shift fore and aft under acceleration and braking — a subtle contributor to wobble that’s easy to miss but absolutely worth checking. Look for rubber cracking or separation from the metal.
Step 7: Verify Caster Angle
If you’ve installed a lift kit without a caster correction kit, your caster is likely negative of spec. Insufficient caster reduces steering stability and makes wobble harder to eliminate even after replacing worn components. You can measure this with a digital angle gauge, or have it checked at an alignment shop. Cross-reference your findings with your recommended JK torque specs and service intervals to make sure nothing was left under-torqued after a previous service.
Work through the list in order. In most cases, you’ll find your answer in steps 2 through 4. On lifted JKs, steps 2 and 7 are where the majority of problems live.
How to Fix Death Wobble: Component-by-Component Repairs
Once you’ve identified the worn or loose components, the death wobble fix on a Wrangler is straightforward — but it must be done with correct torque specs and proper technique. Cutting corners here is how the wobble comes back.
Track Bar Replacement
The track bar is the most common death wobble fix on a lifted Wrangler JK, and it’s one of the more accessible repairs in your driveway.
- Remove the track bar by loosening the axle-side bolt first, then the frame-side bolt; mark the position of the bushings before removal so you understand the wear pattern
- Inspect both bushing bores for deformation, cracking, or the rubber visibly separating from the metal sleeve; if the rubber looks compressed and discolored, that’s your culprit
- If you’re at stock height, a direct OEM replacement restores factory geometry
- If you’re on a lift of 2 inches or more, install an adjustable track bar — this lets you recenter the axle under the Jeep and restore correct geometry; the extra cost ($100–$200) is worth it for the flexibility and better wobble prevention
- Install the replacement with the suspension at ride height (not hanging), so the bushing doesn’t bind during torque; this is important
- Torque to 74 ft-lbs on the axle side and 55 ft-lbs on the frame side
- Re-check the track bar bracket on the axle side for cracks before installing the new bar; if it’s cracked, replace it
DIY cost estimate: OEM or equivalent replacement track bar, roughly $50–$80. An adjustable track bar runs $150–$350 depending on brand. The adjustable option is worth the money if you’re lifted.
Ball Joint Replacement
Ball joint replacement requires a press and is best done with both upper and lower joints replaced as a set. Don’t split the difference here.
- Support the lower control arm and use a ball joint separator to disconnect the joint from the knuckle; never hammer the knuckle to separate it
- Press the old joint out and the new joint in — do not use heat on the surrounding knuckle; heat can warp the bore and cause premature failure
- Torque the ball joint nut to 55–75 ft-lbs (lower) and 50–60 ft-lbs (upper), then advance to the next cotter pin slot — never back off to align the cotter pin; back off only if you’re advancing to the next slot
- Replace both sides if either joint is worn; asymmetric wear is rarely the whole story
DIY cost estimate: Ball joint set (both sides), roughly $80–$150 in parts. Plan for 3–4 hours of labor if you’re doing this at home with rented press access.
Tie Rod End and Drag Link End Replacement
These are among the more DIY-friendly repairs in the front end, and they can usually be done in an afternoon.
- Mark the tie rod adjuster sleeve position before removal — photograph it — to preserve rough alignment
- Remove the castle nut, use a separator to pop the taper, and thread the new end to the same depth as the old one; count the threads if you’re unsure
- Torque tie rod end nuts to 55 ft-lbs, then advance to the next cotter pin slot
- After replacement, have the front end aligned — even a few threads’ difference changes toe and will accelerate tire wear
- Do the same process for drag link ends on the driver’s side of the axle
DIY cost estimate: Tie rod end set, roughly $60–$120. Drag link end, roughly $30–$70.
Wheel Bearing Replacement
Front wheel bearings on the JK are pressed into the knuckle and require a press for proper installation. This isn’t a home job unless you have access to equipment.
- Confirm bearing play by rocking the tire at 12 and 6 o’clock with the axle shaft in place; a failed bearing will have obvious movement
- Remove the hub, axle shaft, and knuckle to access the bearing
- Press the old bearing out and the new bearing in — never hammer a bearing into a knuckle bore; hammering will deform the bore and cause early failure
- Torque the hub nut to 175 ft-lbs and install a new cotter pin
- Verify proper fit before reassembling the axle shaft and hub
DIY cost estimate: Wheel bearing and hub assembly, roughly $80–$150 per side.
After going through this repair myself — track bar and drag link on my own JK — the lasting habit I built was checking every front-end fastener and joint at every tire rotation. It takes ten minutes and it’s caught two loose bolts since. That’s the honest takeaway from the experience, and it’s worth building into your own best lift kits for Jeep Wrangler JK install routine or referencing in your heavy-duty suspension options for the JK research.
Does a Steering Stabilizer Actually Fix Death Wobble?
A steering stabilizer does not fix death wobble — it can only reduce or delay the symptoms if the underlying mechanical causes are still present. That distinction matters before you spend money on one.
A steering stabilizer is a hydraulic shock absorber mounted between the steering linkage and the axle. It damps rapid steering inputs and reduces road shock. If your front-end components are tight and properly torqued, a good dual steering stabilizer is a worthwhile upgrade — especially on lifted JKs running 33-inch tires or larger. It reduces road vibration and improves high-speed stability in a way that’s genuinely noticeable once you’re on the highway.
But if you install a steering stabilizer to mask worn ball joints, a loose track bar, or a blown tie rod end, you are hiding a safety hazard. The stabilizer will reduce the frequency and severity of wobble events without eliminating the root cause. Eventually the wobble will return — often worse — because the underlying wear has continued unchecked while you were driving around thinking the problem was solved.
The correct sequence is:
- Diagnose and repair all worn mechanical components first
- Verify correct torque on all front-end fasteners
- Confirm proper caster angle
- Then evaluate whether an upgraded steering stabilizer makes sense for your setup
For JK steering vibration repair that’s already been done correctly, the Rough Country N3 Dual Steering Stabilizer is a well-regarded upgrade for 2007–2018 JK owners running larger tires:
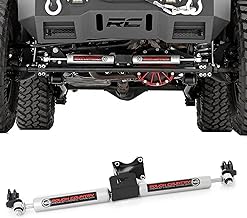
Rough Country N3 Dual Steering Stabilizer for 07-18 Jeep Wrangler JK - 8734930
$149.95
Check Price on Amazon →The dual-stabilizer design provides more damping force than a single unit, which is appropriate for JKs on 35-inch tires or larger. It fits all 2007–2018 JK and JKU models. Do not skip the mechanical repairs and go straight to this product — it will not permanently solve death wobble caused by worn components. Use it as a final upgrade after everything underneath is tight and correct.
Death Wobble Causes: Diagnosis & Repair Summary
If you want a single reference to share or return to, this table covers all seven primary death wobble contributors with testing method, repair, estimated DIY parts cost, and a realistic assessment of whether it’s a driveway job.
| Component | How to Test | Repair | DIY Cost (parts) | DIY Friendly? |
|---|---|---|---|---|
| Track Bar | Observe lateral axle movement while rocking steering; check bushing condition | Replace bushing or full bar; adjustable bar if lifted | $50–$350 | Yes |
| Track Bar Bracket | Inspect axle-side bracket for cracks and deformation | Replace bracket (welded or bolt-on replacement) | $40–$100 | Moderate |
| Ball Joints | Rock tire at 12/6 o’clock with axle loaded on stands | Press out old joints, press in new; replace both sides | $80–$150 | Moderate (requires press) |
| Tie Rod Ends | Grab end and check for stud movement in socket | Remove castle nut, pop taper, thread in new end to same depth | $60–$120 | Yes |
| Drag Link Ends | Same grab-and-check test as tie rod ends | Replace end; mark adjuster position before removal | $30–$70 | Yes |
| Wheel Bearings | Rock tire at 12/6 o’clock with axle shaft in place | Remove hub/knuckle, press out old bearing, press in new | $80–$150/side | Moderate (requires press) |
| Steering Box | Check dead-band in steering wheel before front wheels move | Adjust preload via top adjustment bolt, or replace box if worn | $0 (adjust) / $200–$400 (replace) | Adjust: Yes / Replace: Moderate |
Important note: After any front-end repair, always have the alignment checked and set by a shop. Replacing tie rod ends, the track bar, or control arms changes your alignment settings, and driving on an out-of-spec alignment accelerates tire wear and can reintroduce instability. If you’re buying a used Wrangler, know that JK buyer’s guide (used Wranglers often arrive with worn front-end components) covers exactly what to inspect before signing anything.
Preventing Death Wobble After a Lift Kit Install
The most reliable way to prevent death wobble after installing a lift is to use quality components, set correct caster, and inspect the front end regularly from day one. Most death wobble problems on lifted JKs don’t show up immediately — they develop over thousands of miles as components settle and fasteners see the stress of a new geometry.
A lift kit like the Rough Country 2.5-inch lift for 2007–2018 JK and JKU (part 67930) is a popular entry-level option that fits both 2-door and 4-door models:

Rough Country 2.5" Lift Kit for 2007-2018 Jeep Wrangler JK Unlimited - 67930
$399.95
Check Price on Amazon →Whether you run this kit or a more capable setup, the preventive habits matter more than the brand. After going through the death wobble diagnosis and repair process myself, I’ve kept one non-negotiable routine: every time I rotate tires, I check the entire front end. It takes ten minutes and it’s the single habit that has kept the Jeep trouble-free since.
Here’s the preventive maintenance checklist to build into your routine after any lift install:
- At lift install: Have alignment set immediately, including caster; verify all front-end bolts are torqued to spec at ride height — don’t assume the shop did this
- At 500 miles post-install: Re-torque all suspension and steering fasteners — components settle after initial miles under load; this catches loose bolts before they become a wobble
- At every tire rotation (roughly every 5,000–7,500 miles): Check track bar end play, tie rod ends, drag link ends, and ball joints by hand; this ten-minute check prevents most wobble problems
- Annually or after hard off-road use: Inspect control arm bushings, steering box play, and wheel bearing play
- After any significant impact (trail obstacle, pothole, etc.): Spot-check the track bar and tie rod before returning to highway speeds
For more information on building the right suspension foundation, see best lift kits for the JK and upgrading your JK control arms — both resources cover the component quality and geometry factors that matter most for long-term stability.
Frequently Asked Questions: Jeep JK Death Wobble
These are the questions JK owners search most often once they’ve experienced death wobble. Short, direct answers — because when your Jeep is shaking itself apart, you want information fast.
Q: Can I drive my Jeep JK with death wobble?
A: No — not safely. Death wobble indicates one or more front-end components are worn or loose, and continuing to drive at highway speed risks losing steering control entirely. Drive slowly to a shop or your driveway and do not exceed 45 mph until the cause is identified and repaired. This is a genuine safety issue, not a cosmetic problem.
Q: How much does it cost to fix death wobble on a Jeep?
A: It depends on which components need replacement. A track bar replacement is typically $50–$350 in parts for a DIY repair. Ball joints add $80–$150. If you’re paying a shop for labor, a full front-end inspection and track bar plus tie rod replacement can run $400–$800 depending on your region and what’s actually worn. The key is diagnosing correctly first so you’re not replacing parts that don’t need it.
Q: Is death wobble a factory defect on Jeep Wrangler?
A: Jeep has issued steering-related Technical Service Bulletins for the JK — you can check NHTSA.gov for JK steering TSBs by entering your VIN. However, death wobble is generally considered a characteristic of the solid front axle design combined with wear, lift height, and tire size rather than a defect in new components. It’s common enough in the JK community that it has its own name, but it is not inevitable — proper maintenance and quality components prevent it. The Rubicon vs Sport vs Sahara (suspension and front-end differences) breakdown covers how different trim levels handle front-end geometry differently.
Q: Will a wheel alignment fix death wobble?
A: An alignment alone will not fix death wobble if the root cause is worn or loose mechanical components. Alignment sets the angles of your front-end geometry but cannot compensate for a sloppy track bar bushing or worn ball joint. That said, an alignment is required after you repair the worn components — correcting the geometry once everything is tight is an important final step in the process.
Q: Does death wobble happen on stock Jeeps?
A: Yes, though it’s less common on stock-height JKs running factory-size tires. At stock height and with factory geometry, the front end is less stressed. Death wobble on a stock JK is usually a sign of genuinely worn components — high mileage ball joints, a deteriorated track bar bushing, or a wheel bearing starting to fail. If you’re evaluating a used JK purchase, the used JK buyer’s guide walks through exactly what to check before signing anything.
Q: Can I use a steering stabilizer instead of fixing the worn parts?
A: No. A steering stabilizer masks symptoms but doesn’t fix the underlying problem. Install it after you’ve repaired or replaced all worn components, not instead of repairing them. Using a stabilizer as a Band-Aid will leave you with a bigger problem later, when the wear accelerates and the wobble returns worse than before.
Fix It Right the First Time
The right way to fix Jeep JK death wobble is to diagnose the specific worn or loose component, repair it with correct torque specs, then verify alignment — in that order, without shortcuts.
The four-step repair order:
- Step 1: Inspect the track bar, tie rod ends, and drag link ends first — these are the most common causes and the most DIY-accessible repairs
- Step 2: Check ball joints and wheel bearings with the front axle lifted
- Step 3: Verify caster angle and steering box play
- Step 4: Have the alignment set professionally after any component replacement
After going through this process on my own JK — and finding a worn track bar bushing and loose drag link end as the culprits — the lasting lesson is that the repair is only as durable as the maintenance habit that follows it. A ten-minute front-end check at every tire rotation has kept the problem from returning and given me the confidence to take the family on long highway trips without worrying about what the road will throw at us.
For the full picture on suspension geometry and component selection, start with choosing the right lift kit for your JK, and keep your full JK maintenance schedule handy so nothing slips through the cracks.
Get the Free JK Build Planner
Complete PDF with mod checklists, gear ratios, tire sizing charts, and budget worksheets. Everything you need to plan your JK build.
No spam. Unsubscribe anytime. By subscribing, you agree to our Privacy Policy.
Allan
I'm Allan. I bought a 2014 Jeep Wrangler JKU and I research the hell out of every mod before I touch it. Everything here is tested or deeply researched on my own rig - no sponsored fluff, just honest findings.
Learn more about me →Get the JK Build Planner
Free PDF with complete build checklists, gear ratios, and tire fitment guides.
By subscribing, you agree to our Privacy Policy.
Related Articles
Jeep JK Control Arm Upgrades: When OEM Arms Fail & Which Aftermarket Arms Last
Your JK's control arms are doing something critical right now: they're holding your axle in the exact position your suspension geometry depends on....
Coilover Suspension vs Traditional Lift Kit Jeep Jk Comparison
A coilover suspension is a single-unit shock absorber and coil spring assembly that replaces your JK's factory suspension components, offering height...
Best Steering Stabilizers for Jeep JK: Fix Death Wobble & Improve Handling
Affiliate Disclosure: JeepJK Guide earns a commission from qualifying Amazon purchases at no extra cost to you. We only recommend products we've...