How to Install a Lift Kit on Jeep JK: Step-by-Step Guide
Installing a lift kit on a Jeep JK requires 6-10 hours, basic hand tools, a jack and jack stands, and careful attention to torque specs. The process involves removing stock suspension components, installing new springs or spacers and shocks, reconnecting steering components, and getting a professional alignment afterward. You’ll need a 3-ton floor jack, four heavy-duty jack stands, a torque wrench, and a breaker bar at minimum.
First-timers? Budget 6-10 hours. Maybe 4-6 if you’ve done it before. And you WILL get frustrated at least once—probably when that track bar bolt refuses to line up, or when you realize you needed longer sway bar links that didn’t come in the kit.
But if you’ve done brake jobs and can follow torque specs, you can install a budget-friendly lift kit on your JK. I’m talking about the 2-3 inch spacer or coil spring lifts that most Wrangler owners actually install—not full long-arm systems that require cutting and welding.
This guide covers exactly that: the realistic DIY approach that gets you 2.5-3 inches of lift without requiring a professional fabricator’s skill set. Spend $200-400 on the right tools now, or pay a shop $500-800 for labor. Either way, you’re paying for alignment afterward.
My first DIY job was an oil change—simple enough, but I still managed to overtighten the drain plug. Since then I’ve worked up to brake pads, fluid flushes, and basic suspension work. Each job taught me something about the JK platform, and suspension was where I finally felt like I understood how these vehicles work. The brake caliper slides on the front axle are almost impossible to access without the right combination of extensions and universal joints, but suspension? Once you understand the spring tension and geometry changes, it’s logical.
If you’ve never used a torque wrench, read this entire guide first. Then decide if you’re ready.
Understanding JK Lift Kit Types: What You’re Actually Installing
Walk into any Jeep forum and ask about lift kits. You’ll get forty different opinions in twenty minutes.
The truth is simpler: there are three main types, and only two matter for most DIY installers. Spacer lifts (also called leveling kits) are the cheapest and easiest—you’re literally adding polyurethane or aluminum spacers above your stock coil springs. They’ll give you 1.5-2.5 inches of lift, reuse your stock shocks, and install in 4-6 hours. The RYANSTAR RACING 2” Front & 1” Rear Lift Kit represents this category perfectly: front coil spacers, rear spacers, new sway bar links, and you’re done.
Coil spring lift kits replace your entire springs with taller ones. They’re the most common 2-3 inch lifts because they improve ride quality while adding height. The maXpeedingrods 3” Front & 3” Rear Leveling Lift Kit falls here—you’re getting new coil springs, shock extenders, and mounting brackets. Installation takes 6-8 hours because you’re doing more disassembly, but the ride improvement over spacers is significant.
Then there are full suspension systems with long-arm conversions, adjustable control arms, and geometry correction. They cost $2000-5000 and require skills beyond this guide’s scope. We’re not covering those.
Here’s what actually comes in a typical budget lift kit box: front coil spacers or springs, rear coil spacers or springs, shock extenders (or sometimes extended shocks if you’re lucky), brake line relocation brackets, and maybe sway bar links. The KSP 3” Front and 3” Rear Full Suspension Lift Kit includes shock extenders and all the brackets you need—which matters because missing a $12 bracket will stop your entire install.
Spacer kits are mechanically simpler. Jack up the front, remove the springs, drop spacers in the top bucket, reinstall springs, done. You’re reusing stock shocks, so there’s less to disconnect. But spacers have limitations: ride quality won’t improve (might get harsher), and your articulation suffers because shock travel is reduced.
Anything over 3 inches typically requires additional components that complicate installation significantly. Track bars, longer control arms, extended brake lines, driveshaft modifications—the parts list grows fast. Stick to 2-3 inches for your first lift unless you enjoy buying tools mid-project.
The MR HELLO 2” Front & 1” Rear Lift Kit represents the sweet spot for beginners: enough lift to clear 33-inch tires, simple enough to install in a weekend, cheap enough that mistakes won’t bankrupt you. If this is your first suspension work, start here.
Tools and Equipment You’ll Actually Need
You can’t fake this part.
Floor jack: 3-ton minimum, and don’t cheap out. Your life is literally under this thing. I use a Craftsman 3-ton that’s taken abuse for five years. Harbor Freight aluminum racing jacks work fine if you’re on a budget, but skip the $40 scissor jacks—those are for roadside tire changes, not suspension work.
Jack stands: four of them, rated for at least 3 tons each. Physics doesn’t care about your schedule, and jacks fail. I set stands under the frame rails and sleep fine at night. Some people use blocks as backup—not a terrible idea.
Basic socket set: you need both SAE and metric. JK suspension uses a mix. 18mm for most suspension bolts, 21mm for track bar, 15mm for sway bar links. Deep sockets help on the shock bolts where clearance gets tight.
Torque wrench: this isn’t optional. Get one that reads 0-150 ft-lbs. Control arm bolts get torqued to 125 ft-lbs, track bar to 125, wheel lugs to 95-115. Undertorqued bolts loosen. Overtorqued bolts snap. I learned this by snapping a shock bolt at 55 ft-lbs when the spec was 40. The bolt twisted like a pretzel, and I spent two hours drilling it out.
Breaker bar or impact wrench: suspension bolts are tight, and some have been there since the factory in 2007. A 24-inch breaker bar gives you leverage. A corded 1/2-inch impact wrench gives you sanity. I bought a Dewalt corded impact for $120 specifically for this job, and it’s cut my wrenching time in half on every project since.
The tools that make life easier but aren’t required: spring compressor (only needed if you’re swapping springs and want more control), penetrating oil like PB Blaster (spray rusty bolts 24 hours ahead), pry bar (for persuading track bars), rubber mallet (for persuading everything else).
Safety equipment that’s non-negotiable: safety glasses (springs under tension can send hardware flying), gloves (rust and sharp edges), and common sense. Never trust a jack alone. Always use jack stands. I don’t care if you’re just “checking something quick”—physics doesn’t negotiate.
If you don’t have an air compressor, that’s fine. A good corded impact wrench handles everything except the most corroded bolts. For those, heat and penetrating oil solve most problems. For the rest, call a shop.
Workspace requirements: level concrete surface. Not asphalt (jack stands sink), not gravel (jack stands tip), not your sloped driveway (Jeeps roll). Level concrete. Enough room to lay out parts—realistically two parking spaces if you’re in a driveway. Good lighting, because you’ll be under the Jeep staring at rusty bolts for hours.
Total tool cost if you’re starting from zero: $300-450. Floor jack ($100-150), four jack stands ($80-120), torque wrench ($40-80), breaker bar ($20-30), impact wrench optional ($100-150). That $500 in tools gets used on every future maintenance job, so the investment pays dividends.
{{PRODUCT_CARD:B0D3TDXB5Q}}
Pre-Installation Prep: Setting Yourself Up for Success
The work you do before touching a wrench determines whether this job takes six hours or sixteen.
Spray all suspension bolts with PB Blaster or your penetrating oil of choice 24 hours before you start. If you live in the rust belt, make it 3 days and spray them twice. Track bar bolts, control arm bolts, shock bolts, sway bar links—everything. The difference between a bolt that’s been soaking and a dry bolt is the difference between “comes right off” and “rounded head, now I need a bolt extractor.”
Take photos of your stock suspension from multiple angles. You’ll think you remember how the sway bar connected, which way the shock was oriented, how the brake lines routed. You won’t. Take close-ups of sway bar link orientation, brake line bracket positions, and shock mounting angles. These photos will save you an hour of YouTube searches when you’re reassembling at 9 PM.
Inspect ball joints, tie rod ends, and control arm bushings now. If they’re worn, you’ll curse yourself for not replacing them while everything is apart. I’m not saying you need to replace perfectly good parts, but if that ball joint boot is torn or the bushing is cracked, deal with it now. You’ve already got the suspension disassembled.
Test-fit major components before disassembly. Open the lift kit box, verify nothing is damaged or missing, confirm you have the right kit for 2-door vs 4-door. The 2.5” Lift Leveling Kit instructions should specify JK or JKU—they’re not always interchangeable because rear spring lengths differ.
Start this project on a Saturday morning. Not Friday night. If something goes wrong—wrong part, stripped bolt, missing bracket—you want parts stores open and daylight remaining. I started my first lift install at 6 PM on a Friday. By midnight I was missing sway bar links that didn’t come in the kit, couldn’t get the track bar bolt to line up, and had a Jeep on jack stands blocking my driveway. Parts stores opened at 8 AM Saturday. Those 10 hours were not fun.
Check your JK’s maintenance history. Knowing whether you have the factory brake lines or if someone already swapped in longer ones matters. Understanding if the suspension has been apart before (was it a Rubicon with upgraded springs? A Sport with worn-out shocks?) helps you anticipate what you’ll find. Cross-reference your VIN with common issues for your model year—some 2007-2008 JKs have different front axle brackets that affect lift compatibility.
{{PRODUCT_CARD:B087TCKWX1}}
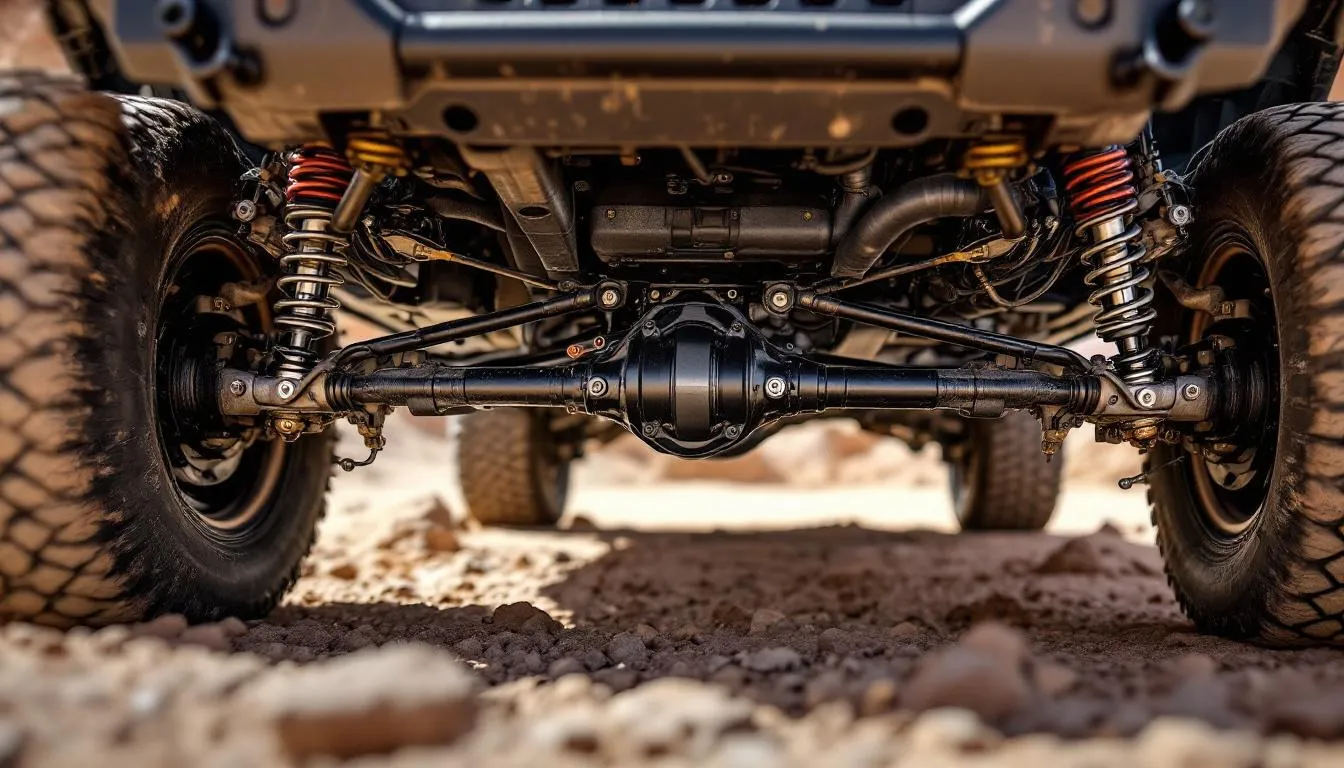
Front Suspension Installation: Step-by-Step Process
Front suspension is where the complexity lives. Track bars, sway bars, steering geometry—everything that makes a JK handle properly gets disturbed here.
Start with the jacking sequence. Chock your rear wheels with something solid—blocks, wheel chocks, large rocks. Loosen front lug nuts while the Jeep is on the ground (you’ll strip lugs trying to break them loose in the air). Jack up the front end using the differential as your jacking point—not the frame rails yet, you need the axle level to remove springs. Once front is high enough, slide jack stands under the frame rails behind the front axle. I put mine just behind where the control arms mount. Remove wheels.
Disassembly order matters. Disconnect sway bar links first—15mm wrench on top, 15mm socket on the bottom. The links will probably fight you. If they spin, use locking pliers on the ball joint shaft. Then shock absorber lower mounts. Most JKs use 18mm bolts. Keep the bolts organized—I use a magnetic tray, but muffin tins work fine.
Now comes the critical part: supporting the lower control arm with your floor jack. Place the jack directly under the control arm spring bucket. You’re about to release spring tension, and coil springs store tremendous energy. People get hurt rushing this step.
Disconnect the brake line brackets from the frame. You’re NOT disconnecting the brake lines themselves—just unbolting the metal bracket that holds the flexi-line to the frame. This gives the brake line slack to move when the axle drops. Most kits include taller relocation brackets.
Remove the track bar from the axle. This is the lateral bar that runs from the frame to the passenger side of the axle. 21mm bolt at the axle end. This bolt will not want to come out. Spray it with penetrating oil, use your breaker bar, maybe heat it if you have a torch. Getting the track bar disconnected is what lets the axle shift position so the springs can come out.
Now slowly—and I mean slowly—lower the floor jack under the control arm. The spring is compressed between the axle and the frame. As the axle drops, tension releases. If you drop it fast, the spring can pop out violently. Go an inch at a time, watching the spring, until tension fully releases and the spring falls loose.
Remove the stock spring. If your kit uses spacers instead of new springs, you’ll reinstall the stock spring on top of the spacer. If your kit has new springs, set the stock one aside—you won’t need it.
Installation sequence: if using spacers, place the spacer in the top bucket (frame side) with any orientation marks facing the right direction. Most spacers have a notch or arrow indicating front-of-vehicle. Install the stock spring on top of the spacer. If installing new springs, seat the new spring in the lower bucket (axle side) first, making sure the pigtail end or orientation mark matches the kit instructions.
Shock extenders: if your kit includes these, install them now. They’re usually simple brackets that bolt between the shock and the original lower mounting point, extending shock travel. The KSP 3” Front and 3” Rear Full Suspension Lift Kit includes these. If your kit came with new longer shocks, install those instead—remove the old shock completely and bolt in the new one.
Raise the floor jack under the control arm to compress the new spring setup. This is the reverse of removal—lift slowly, watching that the spring seats properly in both the upper and lower buckets. You may need to rotate the spring or use a pry bar to guide it into position.
Reconnect the brake line brackets using the new taller brackets from your kit (if provided). Reconnect the track bar to the axle. Here’s where people get stuck: the bolt holes won’t line up. This is normal. The lift changed the axle position. Use your floor jack to shift the axle passenger-side or driver-side until the holes align. Sometimes you need a pry bar for persuasion. Never force the bolt—if it won’t slide in with hand pressure, the holes aren’t aligned yet.
Install new longer sway bar links if your kit provided them. If your kit didn’t include longer links and you lifted more than 2 inches, you’ll need to order them separately. Stock links are too short and will either be under tension (bad) or disconnect completely (worse).
Torque all bolts to spec. We’ll cover the full torque chart in the next section, but don’t skip this. Control arm bolts: 125 ft-lbs. Track bar: 125 ft-lbs. Shock bolts: check your kit, usually 17-40 ft-lbs depending on position. Sway bar links: 75 ft-lbs.
Common issues you’ll face: track bar bolt holes not lining up (use the jack to shift axle position—sometimes you need to raise or lower the axle slightly, not just shift it sideways). Sway bar links too short (if you lifted over 2.5 inches and the kit didn’t include longer links, you’ll need to buy them). Springs not seating properly in buckets (lower the jack, reposition the spring, try again—sometimes the spring pigtail needs to hook into a frame notch).
{{PRODUCT_CARD:B0CRKTJBHF}}
Rear Suspension Installation: Step-by-Step Process
{{PRODUCT_CARD:B087TCKWX1}}
Rear suspension is easier than front. No track bar to wrestle with. Fewer components. If you made it through the front, you’ll cruise through the rear.
With the front still on jack stands, chock the front wheels. Jack up the rear end using the differential as your lift point. Place jack stands under the frame rails. Remove rear wheels.
Disconnect shock lower mounts—same 18mm bolt as the front. Support the rear axle with your floor jack positioned under the differential. Disconnect rear sway bar links if your JK has them. Many Sport and Sahara models don’t have rear sway bars, so if you don’t see links, you’re not missing anything.
Lower the axle slowly to release spring tension. Rear springs are typically less compressed than front (less vehicle weight over the rear axle), but the same safety rules apply. Go slow, watch the spring, don’t rush.
Remove the stock rear springs. Installation sequence: if using spacers (like the MR HELLO 2” Front & 1” Rear kit), place spacers in the upper buckets and reinstall stock springs. If installing new rear springs, seat them in the lower bucket first with proper orientation.
The difference between 2-door and 4-door matters here. JKU (4-door) models have longer rear springs because of the extended wheelbase. Some kits are JK-only, some are JKU-only, some fit both. If you bought a universal kit and have a 4-door, double-check the spring length against the instructions. Installing 2-door rear springs on a 4-door results in either incorrect ride height or springs that won’t seat properly.
Install shock extenders or new shocks following the same process as front. Reconnect sway bar links if present.
Raise the axle with the floor jack to compress the new spring setup. Watch that rear springs seat in both buckets—they’re longer than front springs and sometimes need guidance to find the upper perch. If a spring won’t seat in the upper bucket, you may need to compress the suspension slightly more or angle the axle to help the spring find its home.
Check brake line length. For 2-3 inch lifts, factory rear brake lines usually have enough slack, but inspect them at full droop. If the line is stretched tight, you need longer lines. Don’t ignore this—stretched brake lines can rupture.
Torque rear suspension bolts to the same specs as front. Control arms: 125 ft-lbs. Shocks: per kit instructions. Sway bar links if present: 75 ft-lbs.
Rear-specific issues you might encounter: springs not seating in the upper perch (common with spacer lifts—the spring has farther to travel and may need the suspension compressed more before it finds the bucket). Brake line tension (check this before lowering the Jeep—if lines are tight, stop and order longer lines). On 4-door models, the longer wheelbase means the rear axle drops more when supported, so you may need to position your floor jack closer to the spring bucket for better control.
If you’ve made it this far, the hard part is done. Now it’s just torquing bolts and double-checking your work.
Critical Torque Specifications and Final Assembly
Torque specs aren’t suggestions. They’re the difference between a safe suspension and a catastrophic failure at highway speed.
I learned this the hard way. First lift install, I was so excited to finish that I “made sure everything was tight” without actually using a torque wrench. Two weeks later, I heard a clunk from the rear suspension. Passenger-side lower shock bolt had backed out halfway. The shock was flopping around under load. I’m lucky it didn’t fail completely while I was driving.
Since then, I keep a torque spec journal. Every job, every bolt, recorded. Here are the critical JK suspension specs:
Track bar bolts: 125 ft-lbs at both frame and axle ends Control arm bolts (upper and lower, front and rear): 125 ft-lbs Shock absorber bolts: this varies. Upper mounts are typically 17-23 ft-lbs, lower mounts 40 ft-lbs, but check your kit instructions because aftermarket shocks sometimes differ Sway bar link nuts: 75 ft-lbs Wheel lug nuts: 95-115 ft-lbs (most JK owners torque to 100)
Here’s the critical part: always torque suspension bolts with the vehicle’s weight on the wheels, not in the air. This is called “loaded torque” and it matters because suspension bushings are designed to operate under load. If you torque control arm bolts with the suspension hanging, you’re pre-loading the bushings in the wrong position. They’ll bind, wear prematurely, and possibly fail.
The sequence: lower the Jeep off jack stands, bounce the suspension several times to settle components, then crawl under and final-torque all critical bolts. I use a torque wrench for every suspension bolt even if I used an impact for initial tightening. Impacts are great for speed, terrible for precision.
After 50-100 miles of driving, re-torque everything. Springs settle, components seat, bolts can loosen slightly. This isn’t optional paranoia—it’s how suspension systems work. Set a reminder on your phone, drive 50 miles, crawl under the Jeep, check every bolt. Track bar, control arms, shocks, sway bar links. Takes 20 minutes and prevents disaster.
Final check list before your first test drive:
- Verify nothing is rubbing (turn wheels full lock both directions, look for tire contact with fenders or control arms)
- Check brake line routing for tension or pinch points
- Verify all bolts are tight (at least hand-tight—you’ll do final torque after settling)
- Look for loose tools or parts left under the Jeep (I’ve left a socket sitting on the axle more than once)
- Test drive in a parking lot before hitting the road (low speed, turns both directions, brake test)
{{PRODUCT_CARD:B0DNHRWZ51}}
Post-Installation: Alignment, Break-In, and What to Expect
Professional alignment is mandatory. Not recommended—mandatory.
You’ve changed your JK’s suspension geometry. Caster angle, camber, toe—all affected by lifting the vehicle. A DIY “string alignment” or “looks straight to me” will not cut it for safety, and your tires will be shredded within 500 miles.
Schedule the alignment before you start the installation. I call the shop on Friday, book for Monday morning, install the lift over the weekend. This way you’re not driving on terrible alignment longer than necessary.
Expect to pay $100-150 for a 4-wheel alignment. Some shops charge more if you lifted the vehicle yourself (they consider DIY lifts higher risk). Some shops refuse to align DIY lifts at all due to liability concerns—call ahead and ask.
What the alignment shop will adjust: on the front axle, they’ll set camber (wheel tilt in/out), caster (steering axis angle), and toe (wheels pointing in/out). Rear is typically fixed on JKs—there’s no adjustment back there unless you’ve installed adjustable control arms. If your lift included adjustable front upper control arms, the shop will use those to dial in caster. If you lifted with a budget kit and stock control arms, the shop will do their best but may warn you that specs are “close but not perfect.”
Some lifts require adjustable control arms to get alignment back into factory spec. Anything over 2.5 inches typically needs them. If the shop tells you they can’t get caster in range without adjustable arms, you’ll need to buy them. Expect $150-400 depending on brand.
Break-in period: the first 500 miles, expect some settling. You might lose 0.25-0.5 inches of ride height as springs compress and components seat. This is normal. The suspension will feel stiff for the first 100-200 miles as everything beds in. Some people report new squeaks or creaks during this period—most are just parts finding their position and will go away.
Re-torque all bolts at 50-100 miles. I already mentioned this, but it’s critical enough to repeat. Springs settle, bolts can shift slightly, and you need to verify everything is still tight.
Driving characteristics will change. Higher center of gravity means you take turns slower—the JK was already prone to body roll, and lifting makes it worse. Steering feel is different, often with more wandering on the highway. Budget lifts without geometry correction cause “death wobble” in some cases, though proper installation and alignment prevent most occurrences. Brake dive feels more pronounced because the center of gravity is higher.
Common post-install surprises: death wobble is rare with proper installation and alignment, but learn the symptoms (violent steering wheel shake at 40-50 mph). If it happens, stop immediately and check track bar bolts—usually they’ve loosened. Tire rub at full lock is common, especially if you went straight to 35-inch tires. You may need to trim fender liners or adjust bump stops. New sounds from the suspension are mostly normal settling (springs creaking, bushings finding their position), but if you hear clunking or metal-on-metal contact, investigate immediately.
Common Mistakes and How to Avoid Them
The mistakes that cost time, money, and sanity.
Not soaking bolts with penetrating oil. I cannot overstate how much time this saves. Suspension bolts on a JK that’s seen winter salt are corroded solid. Spray them 24-48 hours before installation. Some people skip this step thinking “I’ll just use an impact wrench.” Then they strip the bolt head, spend two hours drilling it out, and drive to the parts store for an extractor set. PB Blaster costs $6.
Torquing bolts in the air instead of with weight on wheels. This one catches beginners constantly. You finish the install, Jeep still on jack stands, you torque everything, lower it down, done. Except control arm bushings are now pre-loaded in the wrong direction and will bind when you drive. Always do final torque with the suspension at ride height.
Skipping the 50-mile re-torque. Springs settle. Components shift. Bolts loosen. Re-torquing isn’t optional. I’ve seen people lose track bar bolts on the highway because they didn’t re-check them after break-in. That’s how death wobble happens.
Not getting immediate alignment. Some people think they’ll “see how it drives first.” Your toe is off by 0.5 degrees. It drives “fine” for 200 miles. Your tires now have bald inner edges and you need to replace them. Alignment costs $120. Tires cost $800. Do the math.
Spring orientation mistakes. Most coil springs have a top and a bottom, marked with paint or a tag. Installing them upside down affects ride height and can cause contact noise. The pigtail end usually hooks into a specific notch in the frame or axle bucket. Check your kit instructions carefully, look for orientation marks, take photos of how the stock springs were positioned.
Ignoring brake line length. Some lifts require longer brake lines or relocation brackets. Not all kits include them. If you install your lift, lower the Jeep, and the brake lines are stretched tight at ride height, you have a dangerous situation. Stretched brake lines can rupture under pressure. Inspect them carefully at full droop. If they’re tight, order longer lines before driving.
The track bar bolt struggle. This bolt never wants to line up after a lift. Cross-threading it or forcing it because you’re frustrated leads to stripped threads or bent bolts. Use your floor jack to shift the axle position—sometimes you need to move the axle left or right a half-inch, sometimes you need to raise or lower it slightly. Be patient. Never force the bolt. If it won’t slide in with hand pressure, the holes aren’t aligned.
When to stop and call a professional: if you encounter rounded bolt heads that won’t come off, stop. Extracting rounded bolts requires specialized tools and patience. If springs won’t seat after multiple attempts and you can’t figure out why, get help—improperly seated springs can fail catastrophically. If brake lines are tight at full droop and you don’t have replacements on hand, don’t drive it. If the track bar won’t align after reasonable effort and you’ve tried every jack position, a shop can sometimes use hydraulic persuasion you don’t have access to.
There’s no shame in calling for help. I’ve had to walk away from installs mid-project and come back the next day with fresh eyes. Suspension work requires patience, and sometimes the right answer is “not today.”
True Cost: DIY vs Professional Installation
The real numbers.
DIY cost breakdown:
- Lift kit: $85-300 (the budget 2-3 inch kits featured in this article range from the $85 RYANSTAR RACING 2” kit to the $300 full coil spring replacements)
- Tools if you don’t own them: $200-400 (floor jack $100-150, four jack stands $80-120, torque wrench $40-80, breaker bar $20-30, optional impact wrench $100-150)
- Professional alignment afterward: $100-150
- Potential additional parts not included in budget kits: $50-150 (longer sway bar links, extended brake lines, relocation brackets)
- Total first-time DIY: $435-1000
Professional installation:
- Lift kit: $85-300 (same cost whether you install or they do)
- Shop labor: $400-800 (depends on region, kit complexity, and whether you’re in a big city or rural area)
- Alignment: often included in the labor quote, or $100-150 if separate
- Total professional: $485-1100
The real value calculation isn’t just about money. It’s about time and capability.
If you don’t own the tools and will only lift one Jeep, professional installation makes financial sense. You’re paying $400-800 for labor to avoid spending $200-400 on tools you’ll rarely use. But if you plan to wrench on your JK ongoing—and you should, because Jeeps require ongoing wrenching—the tool investment pays for itself. That floor jack, those jack stands, and that torque wrench get used for brake jobs, differential fluid changes, steering repairs, and every other maintenance task.
Time is a real cost. Your first lift install will take 8-10 hours. Maybe more if things go wrong. A professional shop does it in 2-4 hours because they’ve done it fifty times and have air tools. If this is your daily driver and you can’t afford to have it on jack stands for a weekend, professional installation makes sense.
Warranty considerations matter. Some lift kit manufacturers require professional installation to maintain warranty coverage. Check before you start. Additionally, some shops won’t align DIY lift installs due to liability concerns—they don’t want to be responsible if your self-installed suspension fails. Call ahead and verify the alignment shop will work on DIY lifts.
My honest recommendation: DIY if you enjoy wrenching, have a backup vehicle, and value the learning experience. Professional if this is your daily driver, you’re short on time, or you have zero interest in lying under a Jeep for ten hours. Both paths are valid. I went DIY because I wanted to understand how the suspension works, and that knowledge has paid dividends on every trail repair and maintenance job since. But I don’t judge anyone who pays a shop—their time has value too.
The 2.5” Lift Leveling Kit represents the sweet spot for DIY: simple enough that a first-timer won’t get overwhelmed, cheap enough that mistakes aren’t catastrophic, and effective enough to clear 33-inch tires and improve approach angles. If you’re on the fence about DIY, this is where I’d start.
{{PRODUCT_CARD:B0DNQHLQ7G}}
Frequently Asked Questions
How long does it take to install a lift kit on a Jeep JK?
First-time installers typically need 8-10 hours for a 2-3 inch spacer or coil spring lift kit. Experienced mechanics can complete the same job in 4-6 hours. Budget an entire Saturday, and don’t start Friday night unless you have Sunday as backup.
Do I need special tools to install a JK lift kit?
You need a 3-ton floor jack, four 3-ton jack stands, a torque wrench (0-150 ft-lbs range), and basic socket sets in SAE and metric sizes. A breaker bar or impact wrench makes the job much easier but isn’t absolutely required. All tools total $200-400 if purchasing new.
Can I drive my Jeep before getting an alignment after installing a lift?
You can drive slowly and carefully to the alignment shop (within 5-10 miles), but extended driving without alignment will destroy your tires. Toe settings are off after lifting, causing extreme inner or outer edge wear. Schedule alignment within 50 miles of installation maximum.
Will installing a lift kit void my Jeep warranty?
Aftermarket suspension modifications can void warranty coverage for suspension-related failures, steering components, and sometimes drivetrain issues that the dealer claims resulted from the lift. Jeep/dealer policies vary—some are lenient, others are strict. Check your warranty terms and consider waiting until the factory warranty expires before lifting.
Do I need longer brake lines for a 2-3 inch lift?
Most 2-3 inch lifts work with factory brake line length if the kit includes proper relocation brackets. Check brake line tension at full droop (suspension fully extended) before driving—if lines are tight or stretched, you must install longer brake lines before operating the vehicle.
What if my track bar bolt won’t line up after installing the lift?
This is normal—the lift changed axle geometry. Use your floor jack to shift the axle position left, right, up, or down until bolt holes align. Sometimes you need to raise the opposite corner slightly. Never force the bolt—if it won’t slide with hand pressure, keep adjusting axle position.
Why does my Jeep feel bouncy or rough after installing the lift?
New springs and shocks need 100-200 miles to break in and reach their intended ride quality. If the harsh ride persists after 500 miles, check that springs are seated properly in buckets, verify shock orientation is correct, and confirm you’re running appropriate tire pressure (don’t exceed 35 PSI for most off-road tires).
Final Thoughts: Is DIY Lift Installation Right for You?
You can absolutely install a lift kit on your JK yourself if you have mechanical experience, proper tools, realistic time expectations, and patience for troubleshooting.
The key decision factors: if you’ve successfully done brake jobs, understand how torque wrenches work, own or can afford basic tools, and genuinely enjoy wrenching, DIY saves money and builds valuable skills. The knowledge you gain working on your own suspension translates to every future trail repair and maintenance task.
But professional installation isn’t “cheating.” If you value time over experience, if this is your daily driver and you can’t afford downtime, or if you simply have zero interest in lying under a Jeep for ten hours, a good shop completes the job in 4-6 hours, includes alignment, and warranties their labor.
Either way, these non-negotiables remain: proper jack stands and safety equipment aren’t optional, torque specifications must be followed exactly, professional alignment must happen within 50 miles of installation, and re-torquing all bolts at 50-100 miles is critical for safety.
Thousands of JK owners successfully install lift kits on Jeep JK models every year. The Jeep community is incredibly helpful when you get stuck—forums, YouTube, local Jeep clubs. Take your time, prioritize safety over speed, and don’t hesitate to ask for help when you need it.
I’m documenting my entire JK build on this site because I had to learn all of this the hard way. Every guide here started as my own research notes when I needed to figure out a modification or repair. If you’re building a JK or JKU, you’re in the right place. There’s a lot of ground to cover—and a lot of ground to drive.
Whether you choose DIY or professional installation, your lifted JK will take you places the stock suspension never could. That’s what matters.
Get the Free JK Build Planner
Complete PDF with mod checklists, gear ratios, tire sizing charts, and budget worksheets. Everything you need to plan your JK build.
No spam. Unsubscribe anytime. By subscribing, you agree to our Privacy Policy.
Jeep JK Guide
We're JK owners who've been building, breaking, and fixing Wranglers for years. Everything here is tested on our own rigs - no sponsored fluff, just honest recommendations.
Learn more about us →Get the JK Build Planner
Free PDF with complete build checklists, gear ratios, and tire fitment guides.
By subscribing, you agree to our Privacy Policy.
Related Articles
Best Steering Stabilizers for Jeep JK: Fix Death Wobble & Improve Handling

JK Lift Kit vs Leveling Kit: Which Is Right for Your Jeep Wrangler?
Teraflex vs Rock Krawler JK Lift Kit: Which is Better?
Compare Teraflex vs Rock Krawler JK lift kits in detail. Build quality, performance, and value analysis from real-world experience.